NitroPack Overview
What the NitroPack plugin for WordPress is supposed to do is make your WordPress website pages load more quickly by optimizing the code and the images on your site. NitroPack also delivers your web pages through what is supposed to be a fast CDN, which is Content Delivery Network.
NitroPack also helps you to be compliant or at least get close to compliance with core web vitals. As of May 2021, core web vitals are a Search Engine Ranking factor for Google. I’ll talk more about those in just a moment but the goal of NitroPack is to improve your page speed and to potentially help you rank a little bit better in the search engines.
So, NitroPack can provide you an improved user experience when pages load more quickly and it could potentially bring more visitors to your WordPress site. If you rank better in the search engines, this can result in more conversions on your website. So more leads, more newsletter signups, more sales, it could be a real boon to your website.
In this NitroPack review, I evaluate the effectiveness of WordPress Website optimization with NitroPack in terms of increasing page speed and in overall improvement of core web vitals. Note, as part of FlexLeads services, we offer WordPress Website as a Service which provides our clients a super-fast website that is optimized to generate local leads for their business.
NitroPack Performance Video Walkthrough

Core Web Vitals
Before we get started with our NitroPack review, we need to discuss core web vitals. I’m now on Google’s page, which discusses Core Web Vitals. I’m going to do my best to explain this as I understand it, but as with much of Google’s documentation, they seem to take very complex concepts and make them even more complex and hard to understand.
But these are the criteria that you really need to meet to be compliant with Core Web Vitals guidelines. In general, being compliant with these guidelines will likely improve your overall website speed and overall performance.
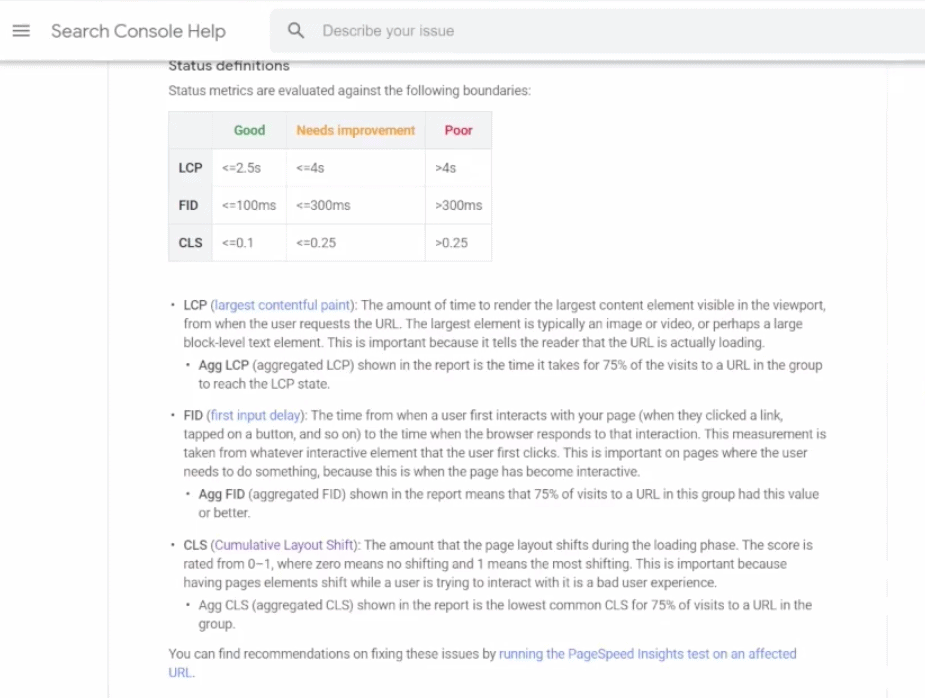
LCP or Largest Contentful Paint
You want that to be under two and a half seconds for your LCP. This represents the amount of time it takes to load the largest element in the viewport for your website.
First Input Delay
That has to do with when a user interacts with your WordPress website. How long does it take for the browser to actually do something about that interaction.
Cumulative Layout Shift
This one, definitely we’ve all experienced this. You’re on a website, especially on mobile and you go to click on a link only to figure out that the website hasn’t fully loaded. And you click on a link that you didn’t mean to click on and you’re brought somewhere else.
So that’s a really poor user experience, and you’ll need to fix your website to ensure that this shift doesn’t occur. All core web vitals optimizations are meant to provide a better user experience. These are used as part of search engine optimization ranking factors as of May 2021.
DentalMarketingClass.com Optimization
So moving on from core web vitals, let’s take a look at the WordPress site that we’re going to be trying to optimize for this review. This is one of my websites that I use for lead generation. It’s DentalMarketingClass.com. It’s a pretty large homepage that was built on WordPress, and it uses the Elementor pagebuilder plugin. For this NitroPack review, we’re going to be analyzing the homepage to check to see how its performance does before and after applying NitroPack.

So what I did to establish a baseline for this review is to make use of two speed / performance websites and two Chrome extensions. First, we’ll talk about the websites.
GTmetrix Page Speed
I ran Dental Marketing Class WordPress site through GTmetrix. What I’m really concerned about here with GTmetrix is the page load speed. They also provide some core web vitals information but I’m not going to get into that right now.
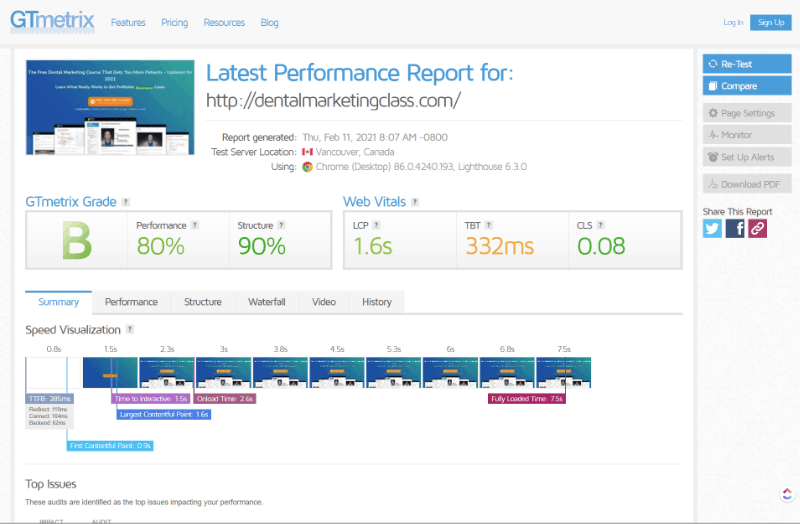
We’re looking at the seven and a half second load time prior to applying NitroPack. We’re looking to improve that. It’d be nice if the grade and the performance and structure improved a little bit too. We’ll have to take a look.
You can see that our overall grade score is a “B”. Not too bad, but it can be improved.
Pingdom Page Speed Test
Pngdom is another easy to use website testing tool. We took a look at when you run this test, you always want to run it from the same location before and after.

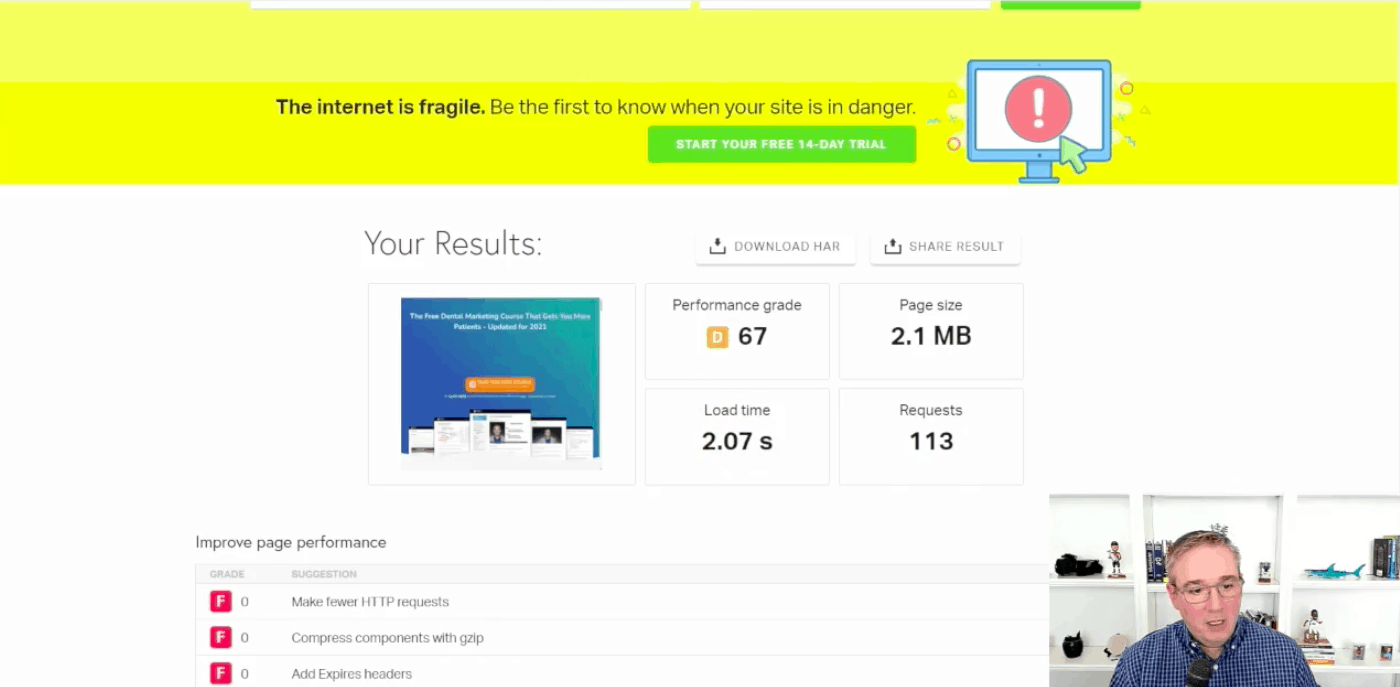
I chose San Francisco, you can see my performance grade score was a D. While we’re not overly concerned about the performance grade – but Google might be. Some of the elements of page score in Pingdom probably factor into core web vitals. Our page load time of two seconds is pretty decent. Any page that loads and around two seconds or less is good.
Now let’s talk about the extensions that I’m using. I’ll go back to DentalMarketingClass.com.
Core Web Vitals Extension
For this next test, I’m using the Web Vitals chrome extension so that I can get a quick look at how I’m doing with core web vitals compliance. I click on it and you can see the WordPress site gets good scores for the LCP and FID, but my Cumulative Layout Shift needs some work at 0.249.

Lighthouse Chrome Extension
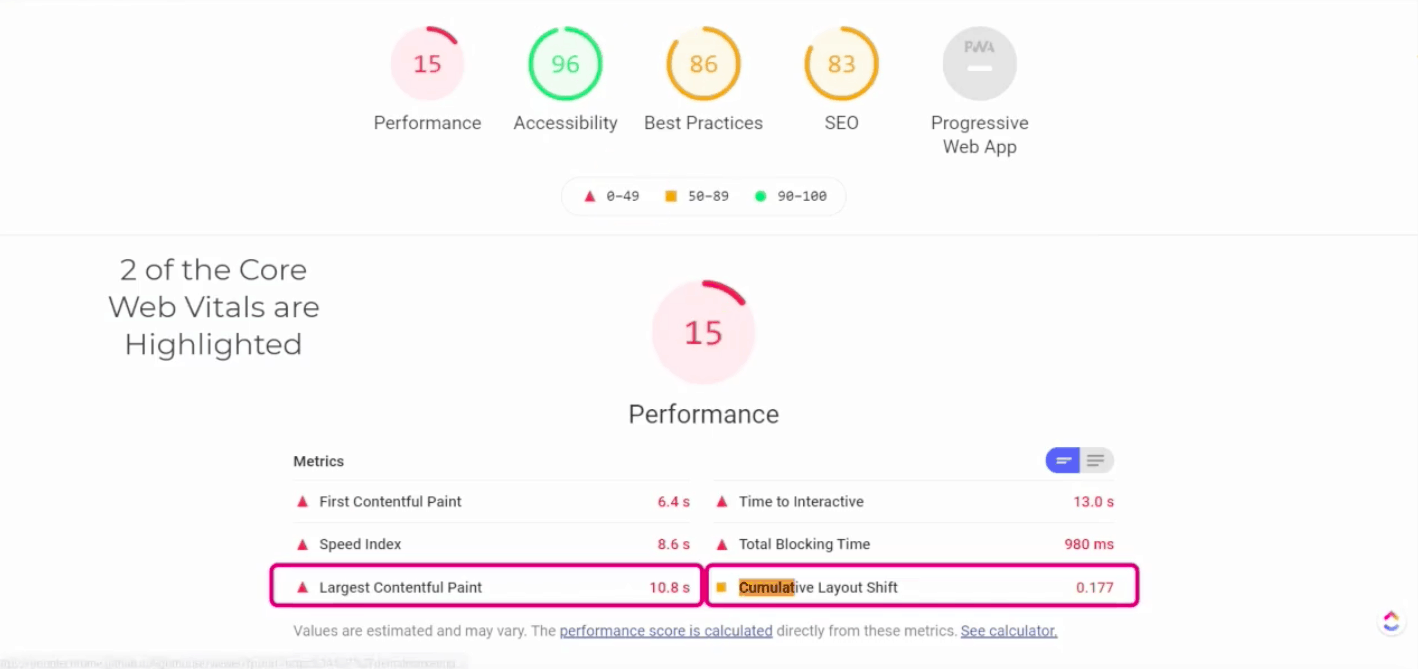
The other thing we’re going to take a look at is the lighthouse report. You need to load the Lighthouse Chrome extension to get this to work. As you can see, the performance score of 15 is not so good. Hopefully that improves after we install and apply optimizations with NitroPack.

First contentful paint is a little high and then cumulative layout shift could use some improvement as well. So now we’ve established a baseline with which measures our speed and our Core Web Vitals. So now we’re going to take a look at NitroPack and see how we can improve upon this baseline.
NitroPack Plugin Installation and Settings
Nitropack Website Dashboard and Signup
To get started with NitroPack, sign up for an account at NitroPack.io. This is the dashboard of the NitroPack website. I’ve already set up an account and I’m going to add my WordPress website from the dashboard.
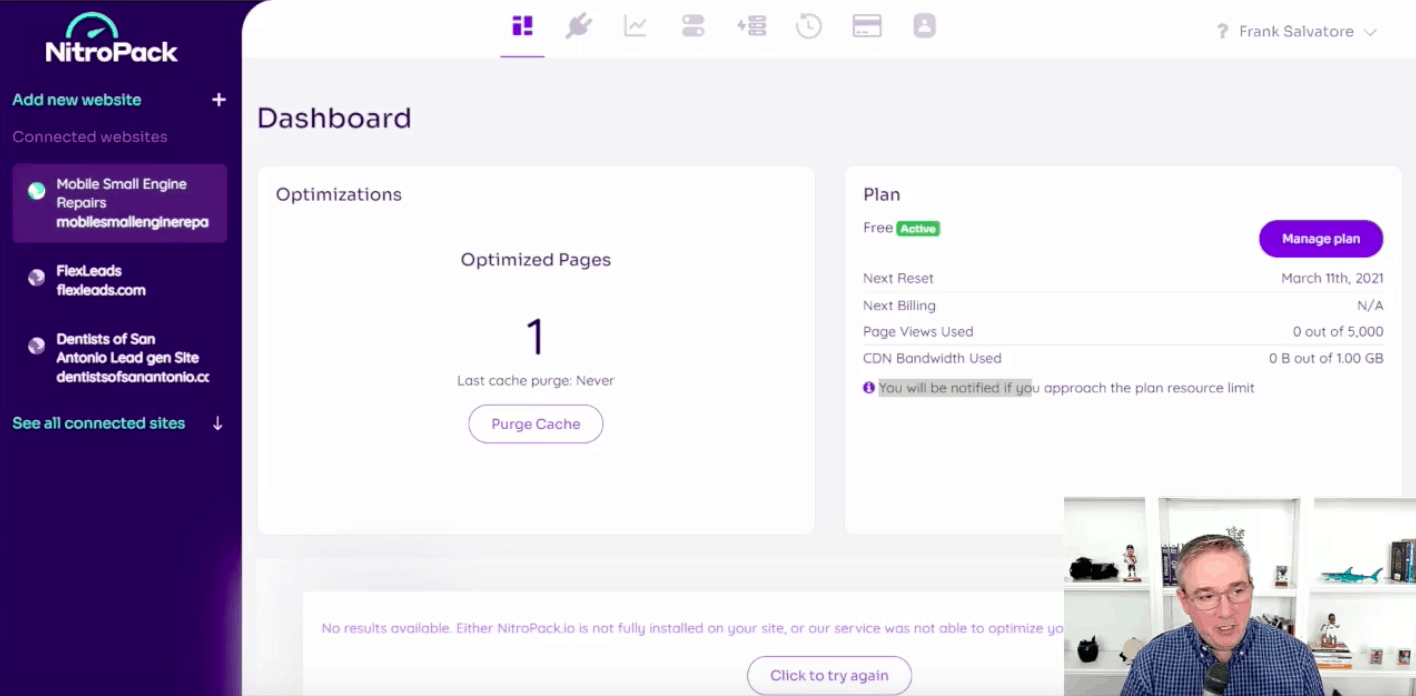
From there, I selected a free subscription and started by installing the plugin for Nitropack on the DentalMarketingClass.com website. So what I’m going to do is I’m going to connect it to NitroPack and I select dental marketing class.
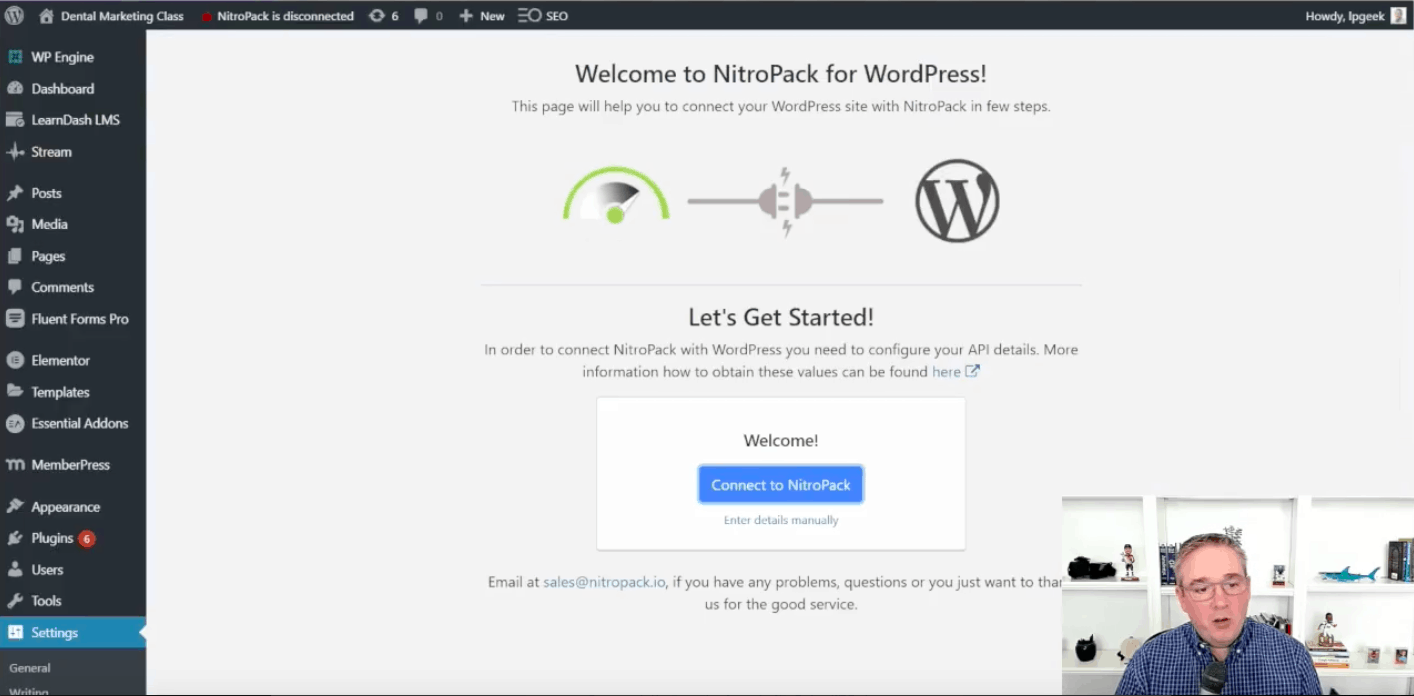
Nitropack Compatibility Warnings
And one thing you’ll notice right away after you install NitroPack is it lets me know of a potential hosting compatibility issue. I’m hosted on WP engine, which is my web host for all my sites. It’s a great web host.
Notice that it says, follow these instructions in order to make sure that everything works correctly. When you install NitroPack, you may see this message based on your web host. You may also see this message if you’re using a CDN, like a CloudFlare, which I use for many of my client websites.

And following these instructions for WP engine, it’s actually really cool. It just lets you know that for URL tagging and post scheduling to work, you’re going to need to get in touch with WP engine support and it even gives you the message to send to support. That’s a really nice touch by NitroPack to have the request message available for you to copy-paste and send to support.
If you don’t do this, it can hurt your marketing campaigns cause your URL tagging won’t work properly and your post scheduling may not work properly either. I’m guessing the post scheduling may not work because of caching issues.
So just follow those instructions. It’s pretty quick with WPEngine. They had me set up within less than a minute.
Other Compatibility Concerns
NitroPack also has compatibility issues with other plugins that focus on speed and site optimization through caching. In the NitroPack help docs, they have a list of each known plugin that may have conflicts with NitroPack.
NitroPack Plugin Caching Settings
As you can see optimized pages here, it can take a long time for this plugin to optimize all of your pages. The cache and optimization process could take hours. As you can see in the screenshot below, it’s up to 23 pages.
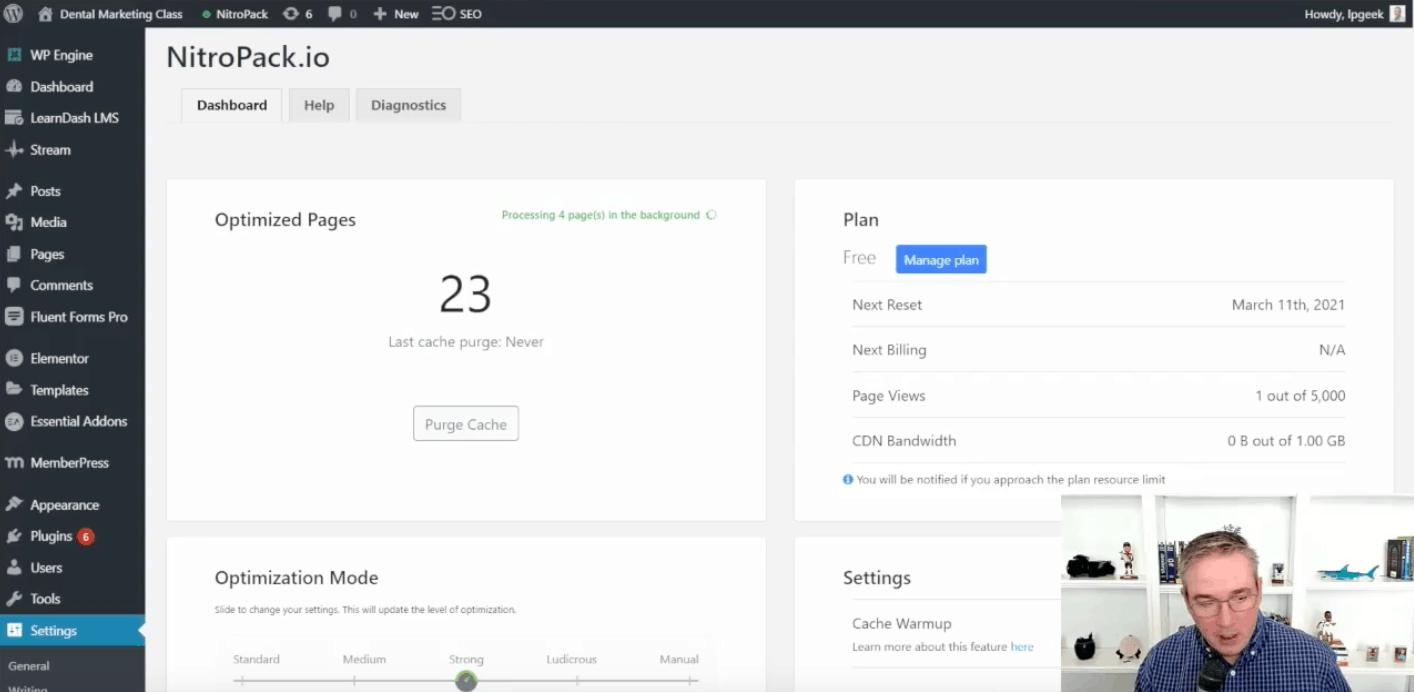
I’ve been letting this run for a little bit and the plugin is processing other pages in the background. Also in this optimized pages section, you have the option to purge cache in NitroPack, and then there’s also a button to invalidate the cache located here. And what that will do is if you’re making website changes and you need those changes to be reflected immediately. That’s why you could purge the cache.
So that the most current version, like if you’re doing something in development and you need to push it out into production, that’s what you do, you purge the cache.
Optimization Mode for NitroPack
This is an interesting one because NitroPack recommends “strong” for the optimization mode when you’re starting out. It’s a good balance.
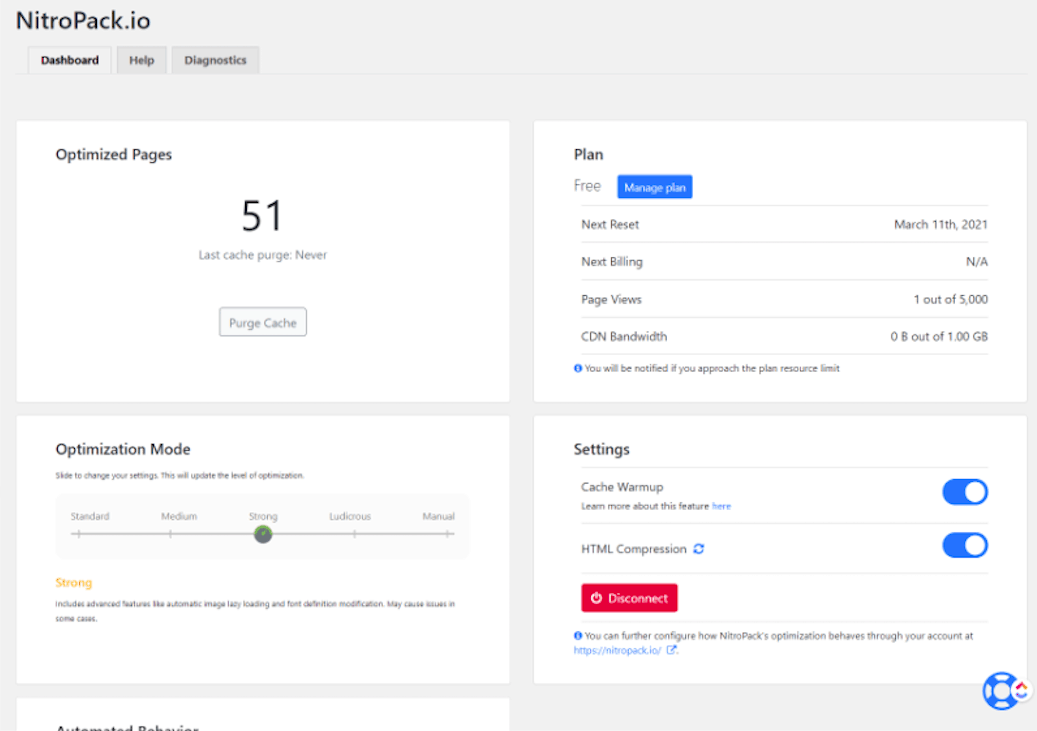
They say changing the optimization mode in NitroPack is a tradeoff between speed and functionality. If you go to ludicrous mode, it’s a little bit more of a chance that your website could break. So you want to be careful with the ludicrous setting. And just to note, I’ve done this a few times and the default is always ludicrous, even though the strong optimization is what is recommended.
I would start with strong and then see if your metrics improve. If you need more performance, especially to be compliant with core web vitals, then maybe move it up to ludicrous.
Settings Cache Warmup
What this means that your pages will be loaded into the cache in NitroPack regardless of whether or not anyone has found that page organically.
So this just means that a fast page is always ready to be served to the user from the cache. Using HTML compression will have NitroPack compress the HTML, improving optimization by making the code a little quicker to load. And then automated behavior you can see, I chose these or off by default but I enabled both automated behavior, effective cache when content is updated or published.
So if you have a new (updated) version of a page that needs to be loaded, NitroPack will get rid of the old version from the cache and then you can actually select in WordPress what page or post types get optimized in case you didn’t want to optimize by category or tag.
NitroPack Website
You can take a look. Originally this screenshot from the NitroPack site was taken when the website was initially connected. You can download NitroPack by clicking on the “browse downloads” button which leads you to a WordPress connector. We have an API if you’re not using WordPress. If you’re using another web development platform, you can also use NitroPack through an API.
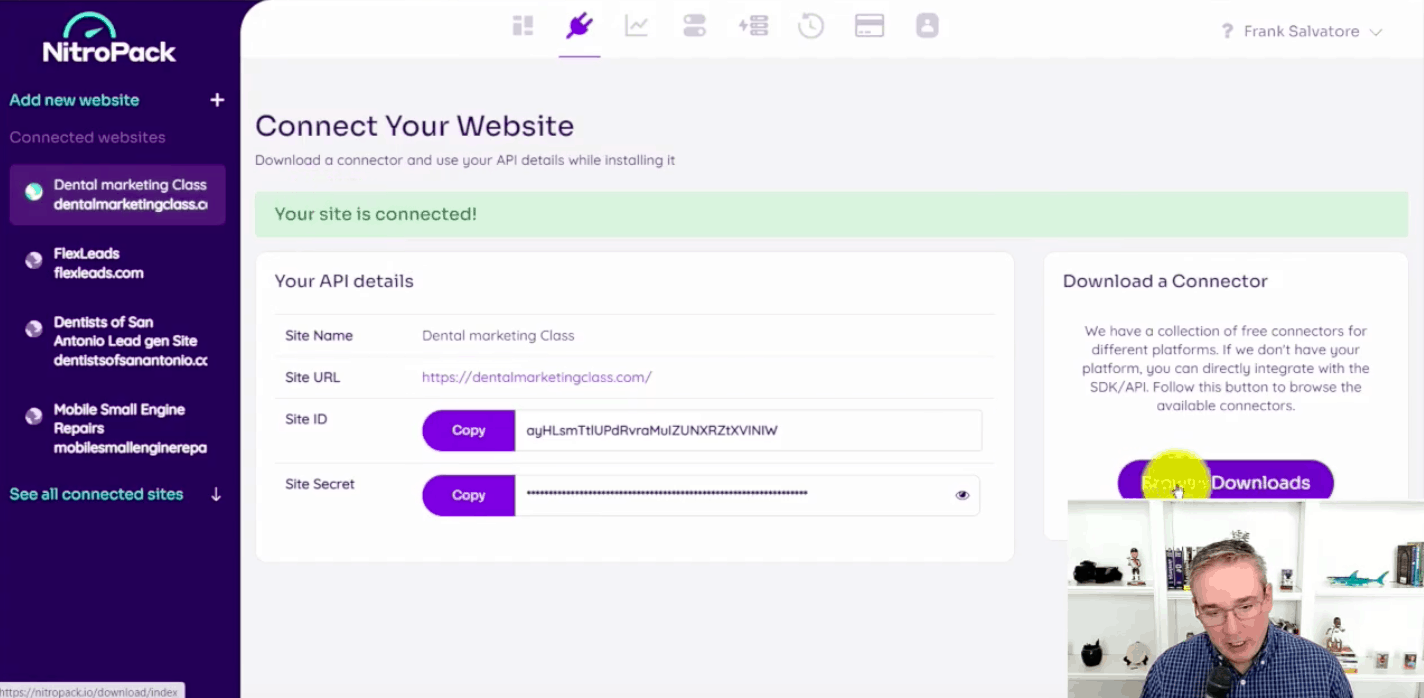
Nitropack Plugin for WordPress Download
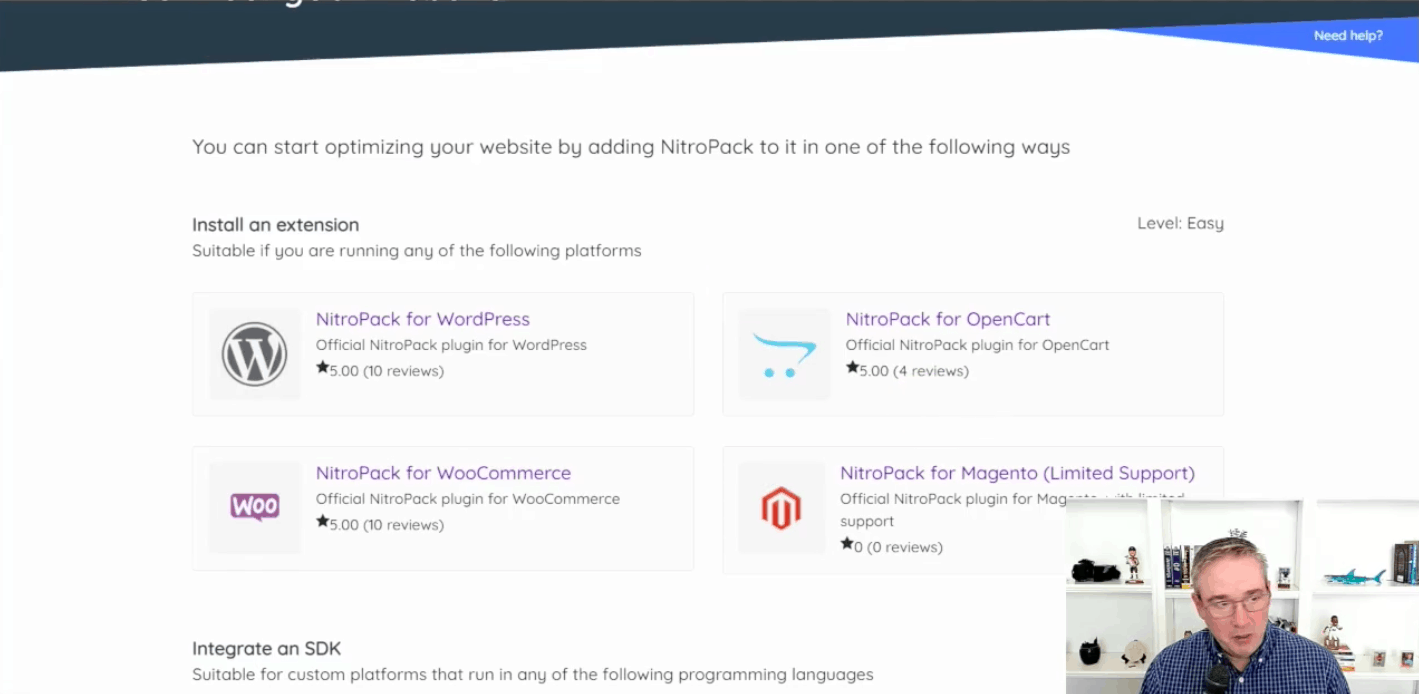
But if you’re using WordPress, you can just browse downloads and you can see it’ll give you the option to download the WordPress, the NitroPack for WordPress plugin and the other options for connectors.
You can also download the Nitropack Plugin here.
This is interesting because here, NitroPack shows the pages on my WordPress site (Dental Marketing Class) that have already gone through the optimization process.
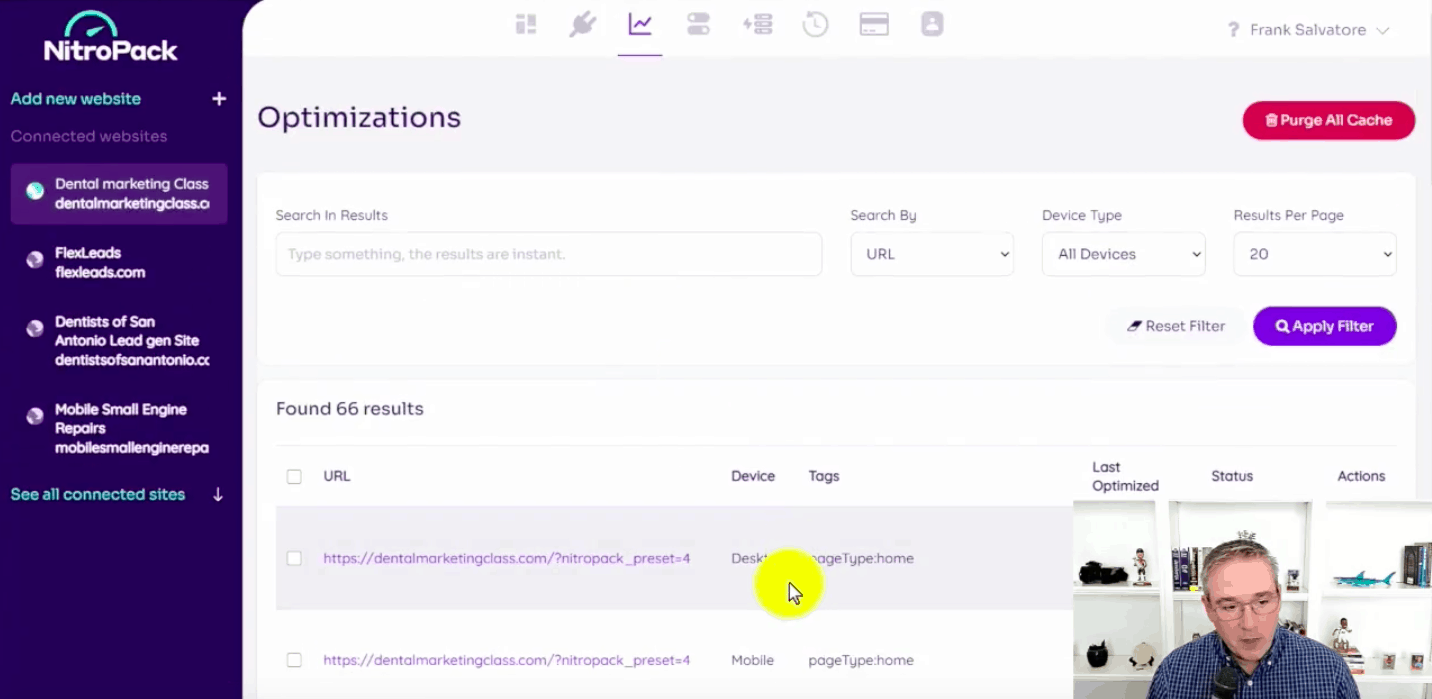
So you can see as pages are optimized in WordPress, they will appear here on the NitroPack site dashboard. The key thing to point out here is that it’s just really easy to set Nitropack up and get started. Now let’s take a look at the metrics.
NitroPack Plugin Test Results
Now what we’re going to do is take a look at the NitroPack optimization results – and the improvements are pretty amazing.
GTMetrix

Now let’s take a look at the results after we applied NitroPack.
Our overall grade score went from a B to an A. The optimizations performed by Nitropack improved our performance score up to a 94% (from an 80%), structure improved from 90% to 99%. The fully loaded time of 2.1 seconds versus 7.5 seconds which is one of the most remarkable improvements in overall performance. So, we’ve seen a major improvement in load time and overall stats thanks to NitroPack. GTMetrix seems to really like the changes we’ve made.

Pingdom
If we go to Pingdom, the initial page speed test, our site had a performance grade of a D, 2.07 seconds load time that is now improved to performance grade of A and we shaved off what little more than a quarter of a second load time. Every little bit helps. NitroPack definitely improved our overall statistics.

Lighthouse Extension
This is Google’s official Chrome extension. Performance was a 15 before NitroPack and now it’s a 76. So that’s a nice improvement and we could see two of the core web vital factors here. Cumulative layout shift to 0.177 that needed improvement and it’s been improved tremendously to 0.01.
First Contentful paint went from 6.4 seconds, which was not within Google’s recommended guidelines to 1.3 seconds. So, excellent performance so far.

Web Vitals Extension
Next thing we look at is the core web vitals extension. It was at red. Before the cumulative layout shift was 0.254, after applying NitroPack, that has since moved to green at 0.062.


NitroPack Summary
So to wrap up this review, NitroPack has provided significant improvements in our page load time and our core web vitals. I’m using the free plan for this test, which is supposed to put a kind of a little bit of a banner for NitroPack in the footer. I’m not seeing it there yet. I imagine it’ll get there eventually. So that’s the free plan, but it still makes things so much faster and I highly recommend you to check this out for your WordPress websites to make them faster and to perhaps help you with your Search Engine Rankings.
