The Right Way for Home Contractors to Create a YouTube Channel
As a home services provider, you want to stake your claim and get your brand out there on many social media sites. One of the most important places to get your message out is on YouTube.
YouTube is the third largest search engine after fellow Google properties – Google, and Google Image search. YouTube videos frequently appear in regular search results – increasing their reach.
With YouTube, you can create your very own channel, with different playlists. You’re able to showcase the quality work and great services that you provide on your YouTube channel.
This post shows you how I set up the ContractorFAQ YouTube channel. Note that getting a channel set up for your brand can be a little bit tricky – I encountered a couple of sticking points along the way even though I’ve done this multiple times in the past.
PreRequisites
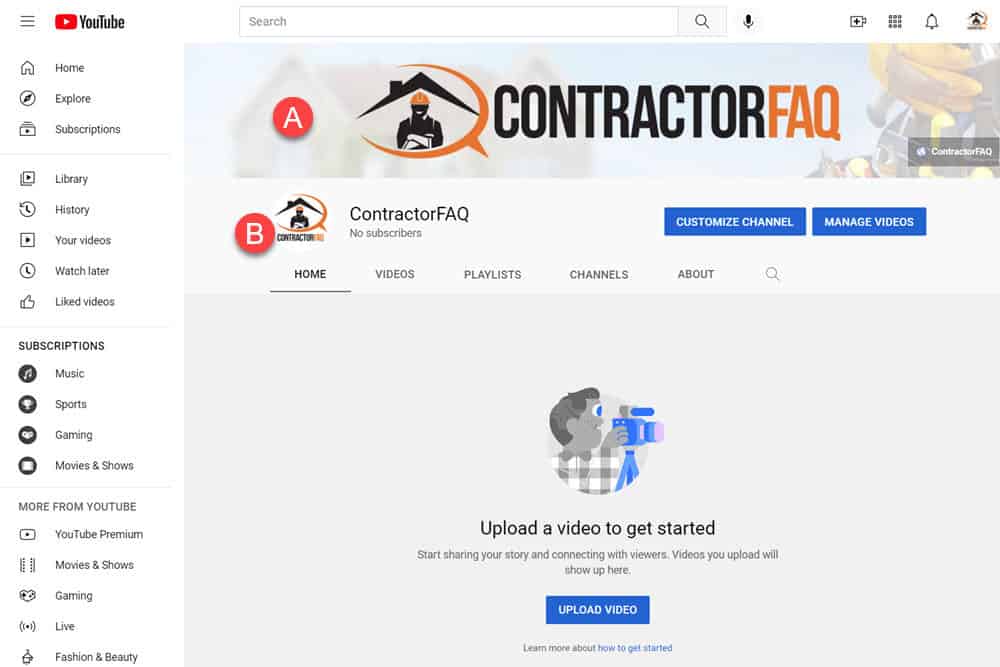
Prior to getting your channel established, you’re going to want to have a cover banner and a logo ready. Details are provided below, but here is what the finished channel looks like with both the cover banner and logo in place.
1) A Cover Banner
You’ll want an image that is less than 6MB with dimensions that are 2048 pixels by 1152 pixels. This will need to be a big image.
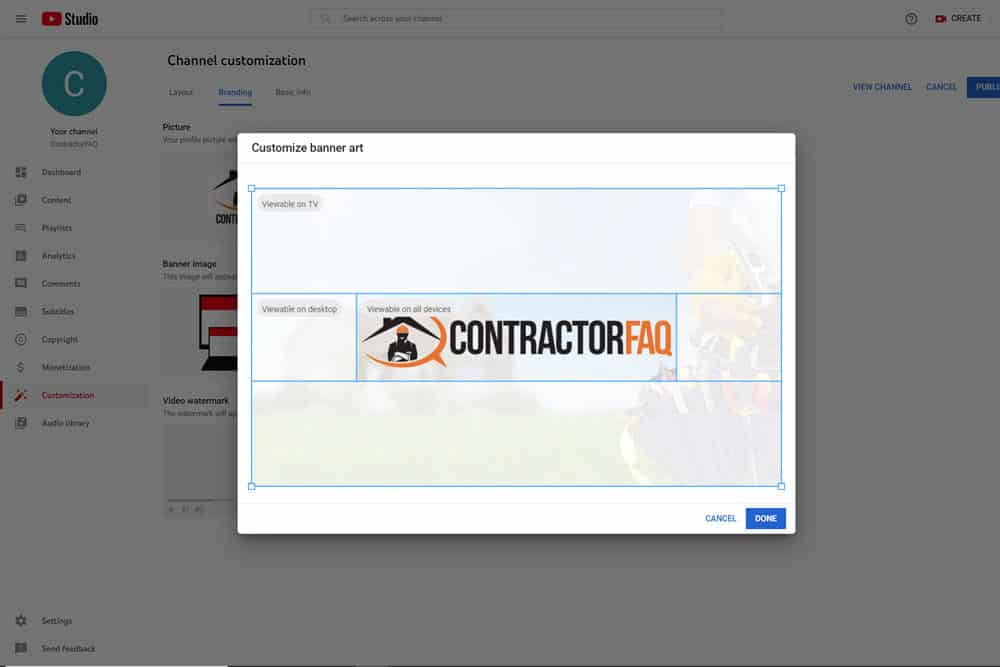
It is a bit tricky as you’ll see when we discuss branding. You’re going to want the important part of your banner to be centered, and take up no more than about 30% of the available height and no more than 60% of the available width. This is so the important part of your banner is viewable on all devices.
If you’re using the recommended dimensions of 2048×1152, this means that the important part of your banner image should be centered and be about 1230×330.
I like to use a background that is already on my main website – along with my logo. This helps to make it perfectly clear that when a visitor is on my YouTube Channel, that this channel is part of the ContractorFAQ brand.
This will provide a consistent look and feel across all of your properties across the web. As visitors move from your website to your YouTube channel, this will create a seamless experience as they know they’re still viewing your company information.
2) A Logo
You’ll want to have a .gif or .png file that is at least 98 x 98 pixels and less than 400 MB. I would advise going significantly larger than 98 x 98 so that the resolution of your logo looks good when resized using YouTube tools.
Your logo must also look good in a circular format, so you may wish to have some spacing around your logo – especially in the corners as these will be cut off when the logo is displayed on YouTube.
YouTube Signup and Channel Verification
1) Make sure you’re logged into your Google Account
Hopefully, you already have a Google Account. Google is everywhere and you really need a Google Account to take advantage of Google’s marketing tools and services – like YouTube, Google Analytics, and Google Ads.
If you don’t already have a Google Account, I recommend that you sign up for a Google Account with a business-based domain name.
2) Go to YouTube.com and Create a Channel
We’re going to set up a brand channel only – not a personal YouTube channel. A brand channel allows you to give other people like employees or marketing agencies access to your channel. This will allow them to add or edit your videos.
We’re going to go to this link: youtube.com/channel-switcher
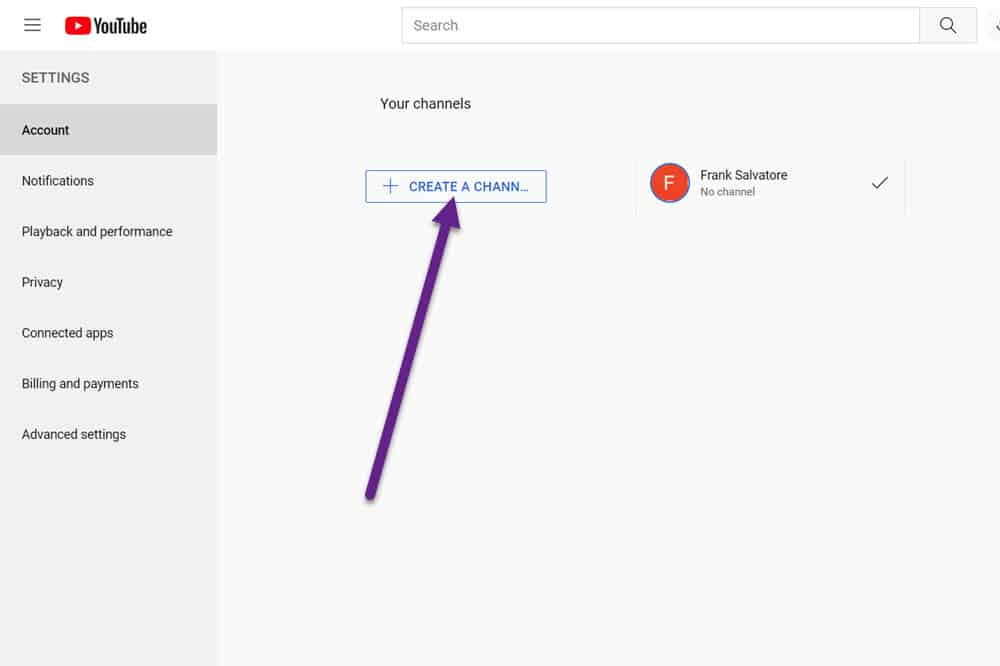
Go ahead and click on the “Create Channel” button as shown above.
3) Name Your Channel
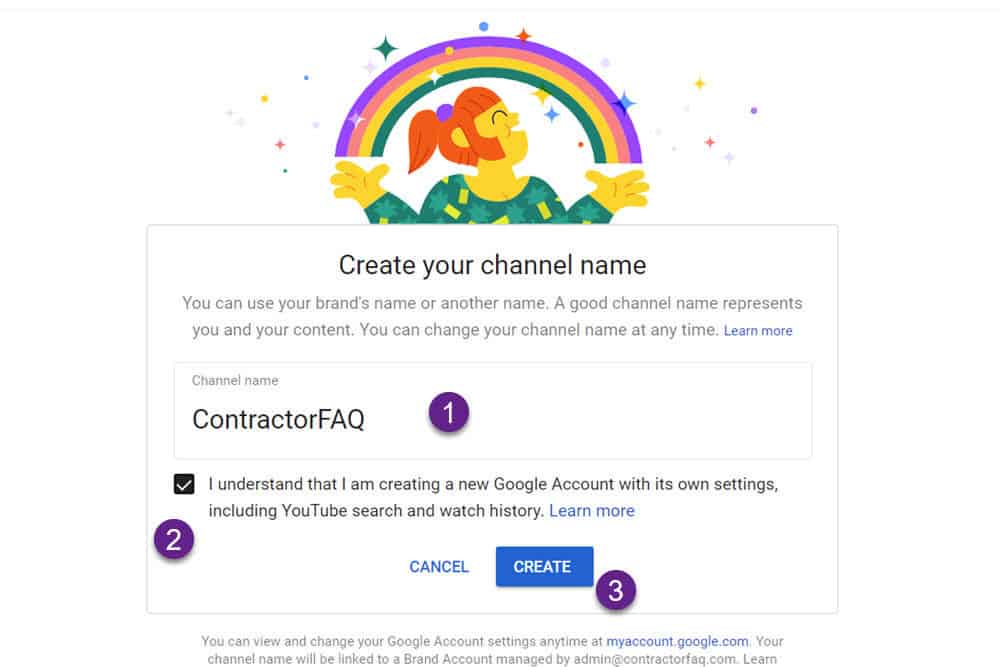
From the next screen, you’ll provide your brand channel with a name (1), confirm that you’re creating a new account(2), and click the create button (3)
4) Access the Newly Created Channel
Unfortunately, I received this strange “This channel does not exist” warning when I attempted to signup, but it did create the brand channel.
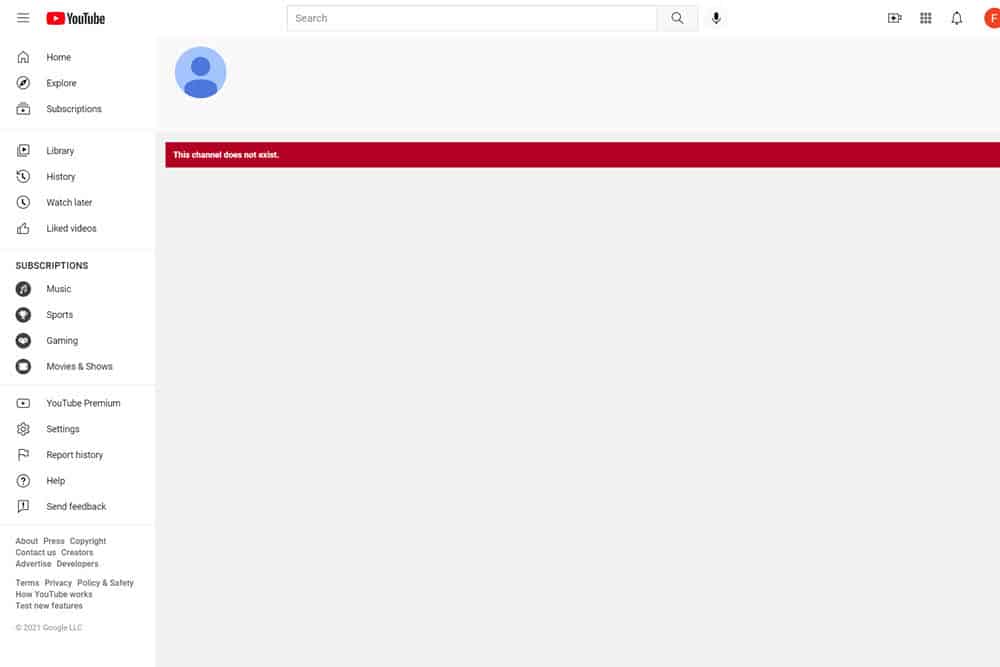
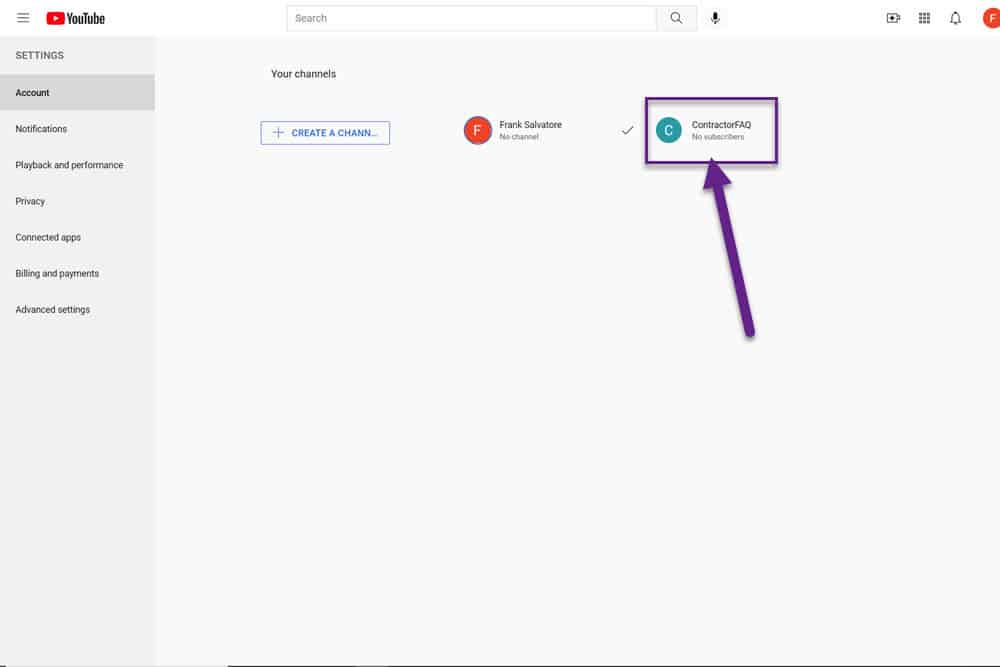
If you see this, don’t panic. What I did was click on the icon in the upper right and selected “settings” from the drop-down menu and was taken to the account page, where I selected “Add or Manage Your Channels” as described in the two images below.
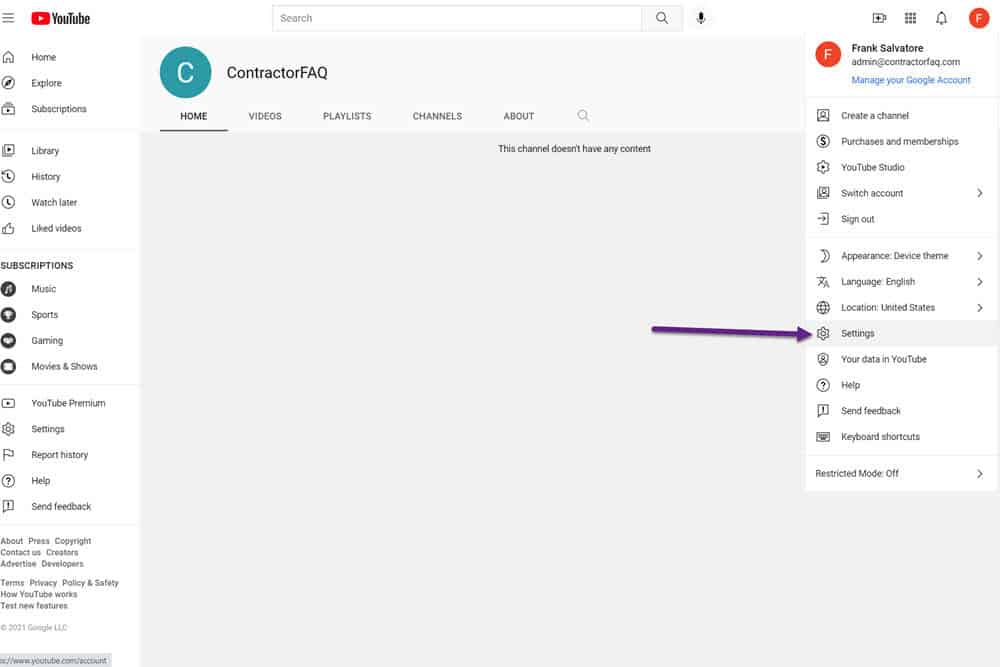
Select “Add or Manage Your Channels” to get access to the brand account that you just created.
You should now see all the channels associated with your account. If you’ve never had a YouTube channel before, you should just see your brand channel. In this case, we see the brand channel we just created – “ContractorFAQ” and we go ahead and click on it. You’ll then be able to make modifications to your channel as shown in the next step.
5) Verify Your Channel with YouTube
We want to take advantage of the full capabilities of YouTube. In order to have a polished channel with custom thumbnails and videos of 15 minutes or more, we need to verify our channel.
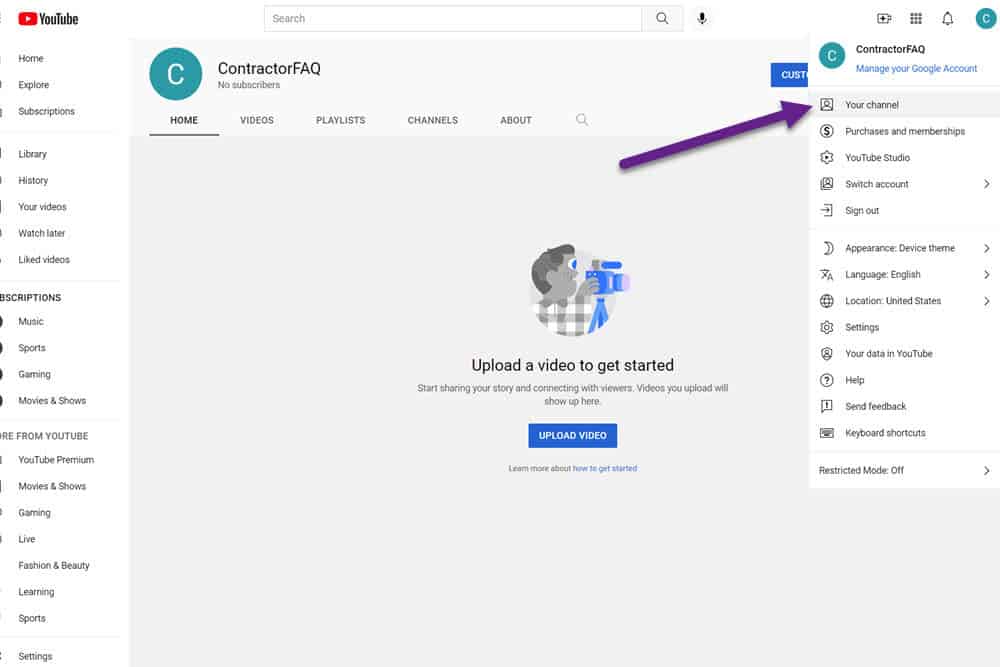
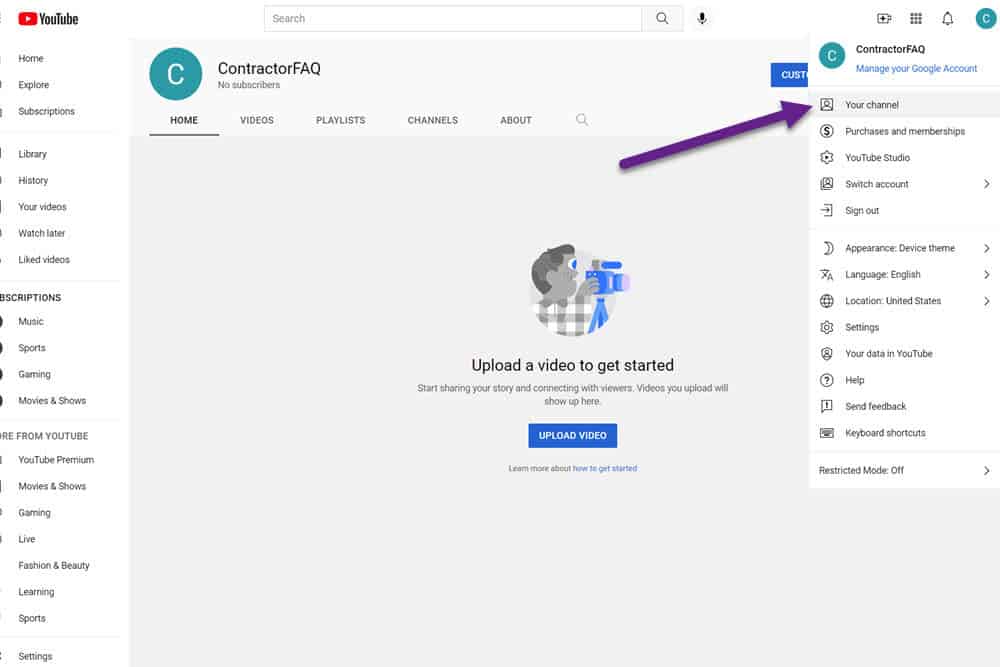
Go ahead and click on your brand channel avatar in the upper right and select “Your Channel”
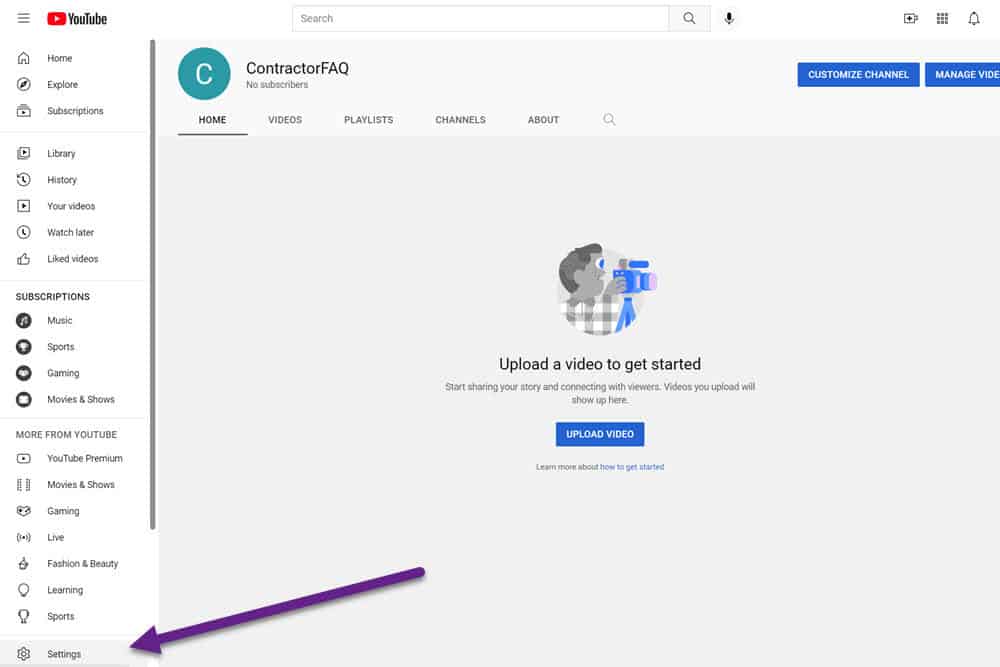
From the next screen select “settings” towards the bottom of the left-hand menu
*
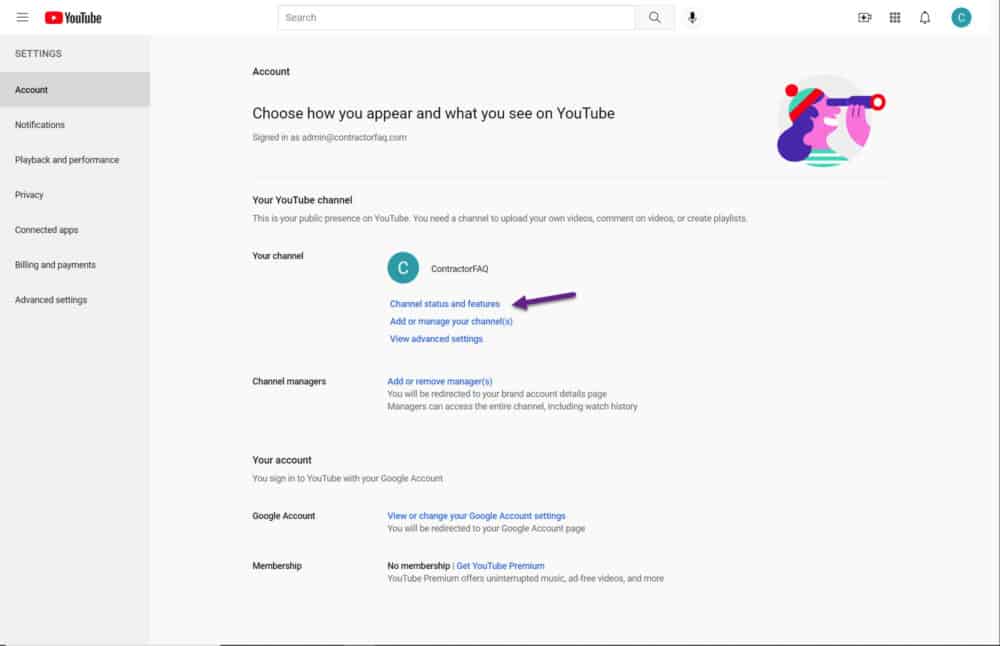
You’ll then want to select “Channel status and features” from the account settings screen
Expand the “Features that require phone verification section” from the popup menu that appears. Now we’re going to click on the “Verify Phone Number” button.
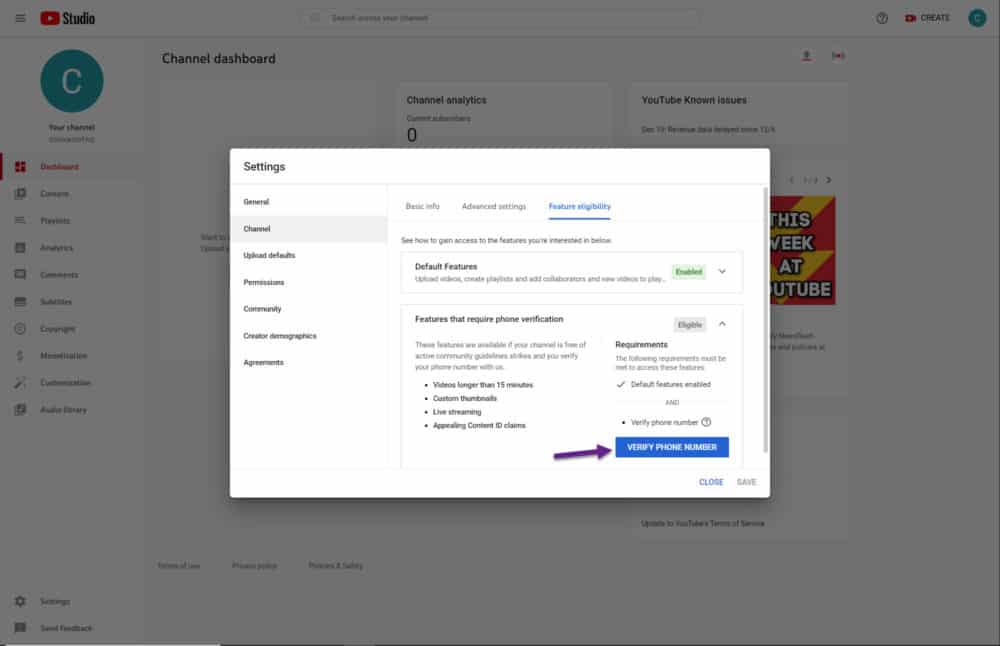
You’ll be taken to two screens where you’ll have the ability to verify your phone number by having Google text or call your phone.
Customize Your Channel
Next, we’re going to get your channel set up with branding as well as establish some initial settings.
To make sure we’re going to the right place, click on “Your Channel” under your avatar in the upper right
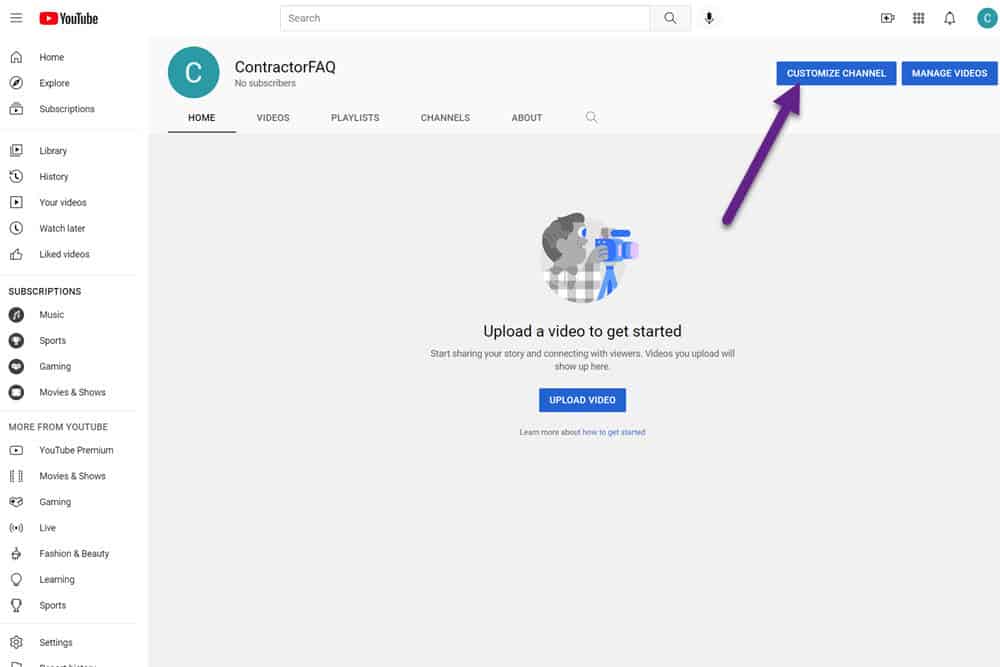
Then click on the “Customize Channel” button that will appear in the upper right.
1) Update Your Branding
Profile Picture
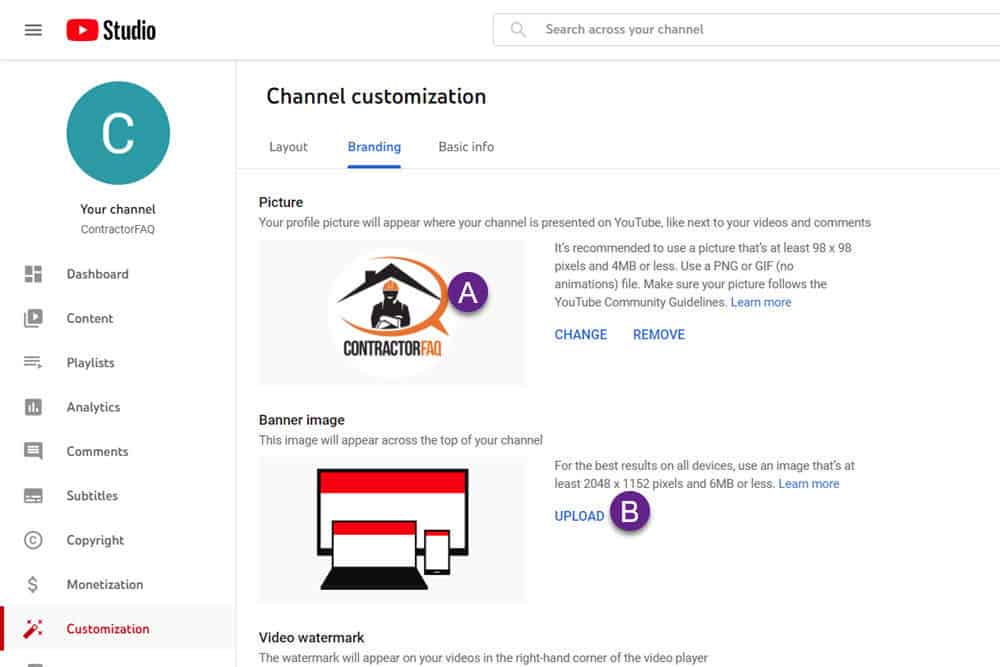
Go to the Branding Option in the customization section. We’re going to start by updating our profile picture. I choose to use a logo for this part.
As mentioned previously, we’re looking for a .gif or .png that is 98×98 or larger that is also 4MB or less.
When you have your photo ready, click on upload and select a photo from your computer.

In the image below, I’ve selected my ContractorFAQ logo – which barely fits within the circular boundaries. You can resize by dragging the corners.
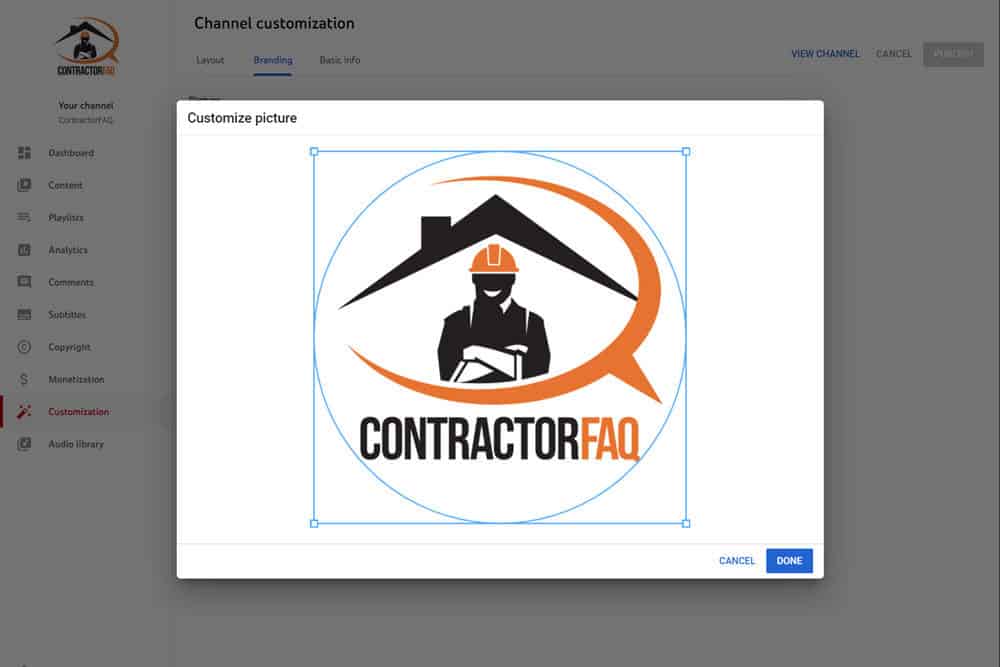
Click the “Done” button and you will now see that our profile picture is now the ContractorFAQ logo in the image below.
Banner Image
Our next task is to upload our banner image. Select “Upload” within the banner image section (B) below.
Select a picture to upload. As you can see the most important part of the uploaded banner appears within the somewhat small “Viewable on all devices section”. I click the Done button to accept the banner art.
Video Watermark
The last option for branding is a video watermark. I view this step as somewhat optional for home contractors, but I’m going to follow through with the process to show how it is done. There are two general approaches towards using a video watermark – a branded watermark, or a subscription button watermark.
Branded Watermark – You can upload a branded watermark if you believe your videos will get wide distribution or a lot of views on YouTube. The watermark can help to prevent people from stealing your video content – and it can also improve brand recognition.
Subscription Button Watermark – You can also upload a subscribe button that you can put on your videos. When people click on the video, they’ll automatically subscribe to your YouTube channel.
Whether you choose a branded watermark or a subscription watermark, you’ll follow the process that follows.
I click upload in the video watermark section, and I upload a transparent .png that is a square and can be sized down to 150×150 pixels.
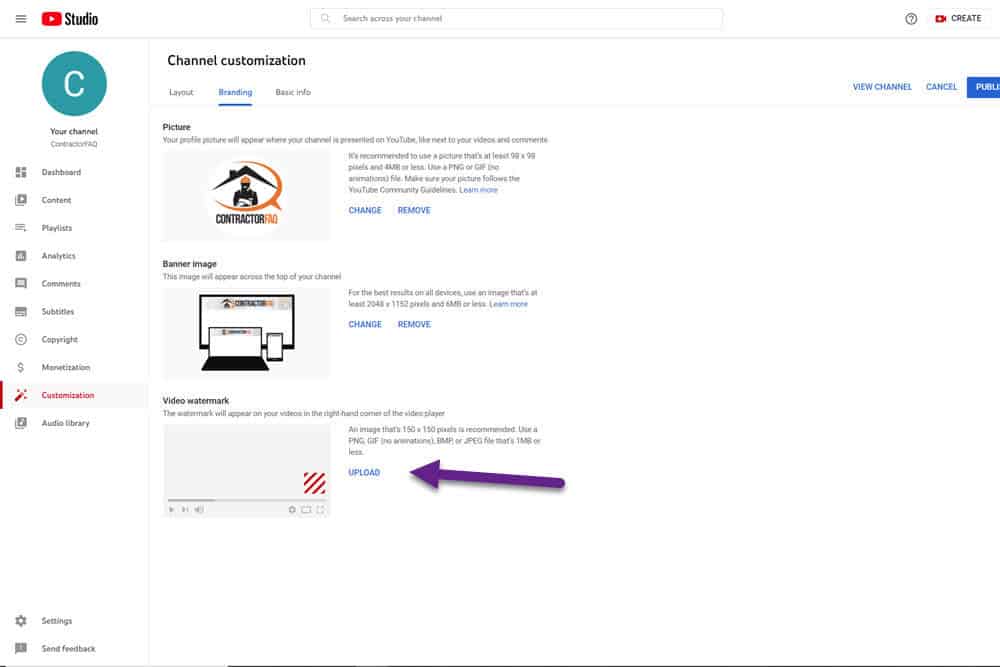
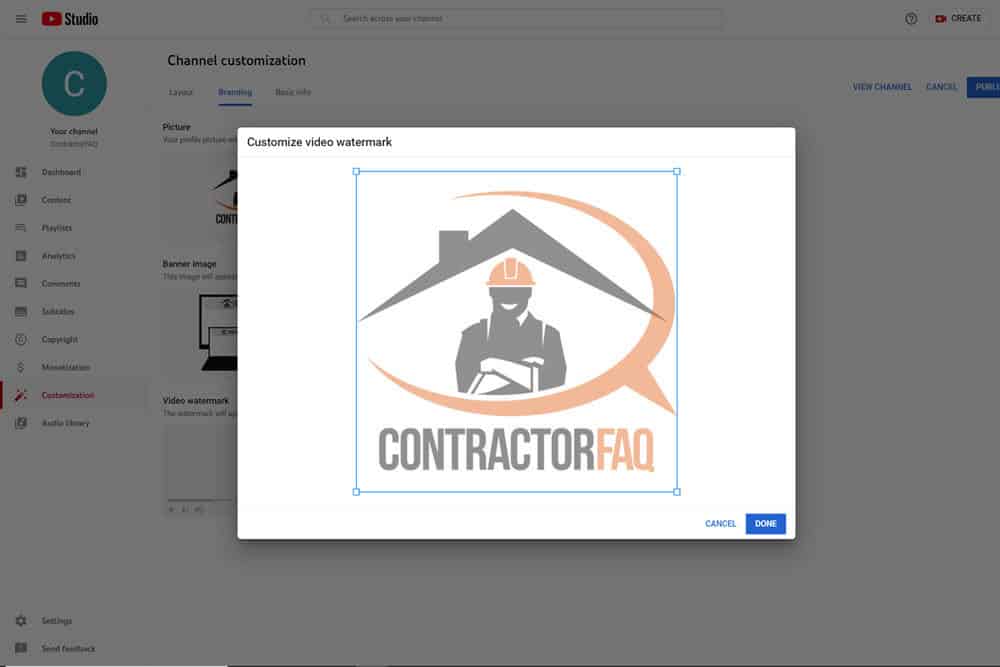
Note that you may wish to make the logo somewhat transparent so it doesn’t interfere with your viewers who are trying to watch the video. The watermark will overlap your video content. I put my transparency of the logo at 50%. You may also wish to make your logo white (as well as transparent) to not interfere as much with the viewer’s experience.
Once you’ve uploaded your watermark, you have a variety of options for when the watermark will appear – at the end, at a custom time, or the entire video.
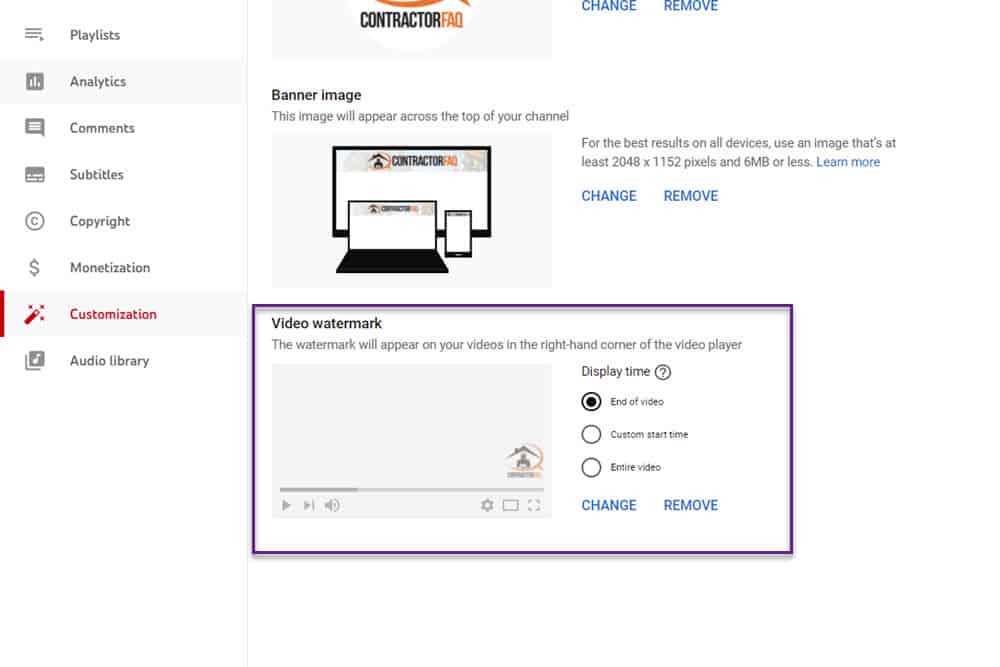
If you’re using a branded watermark, you’ll probably want it to appear for the entire video – just make sure your video watermark doesn’t obscure your video content from the viewer.
If you’re using a subscribe button watermark, you’ll probably want to wait before showing the subscribe button. The user needs to get a chance to view your content before committing to subscribing. Asking them to commit to subscribing (even though it is free) probably won’t result in a subscription if you ask too early in your video.
2) Update Your Basic Info
Here, you’ll enter basic information about your YouTube channel.
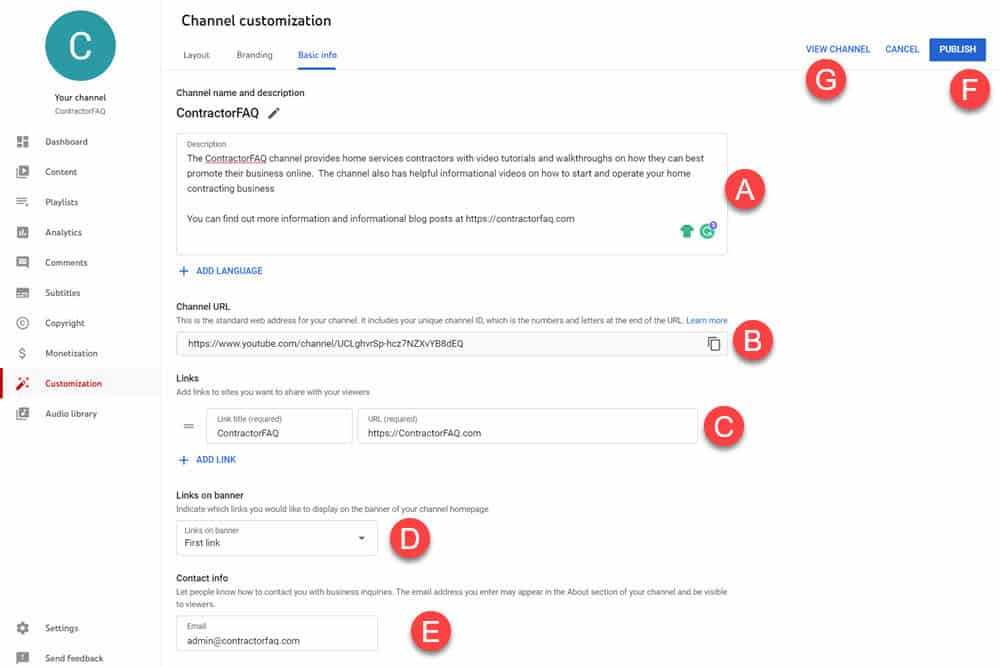
Description (A)
Enter the purpose of your channel. It should closely match the messaging on your main website. It should also describe exactly what value you are providing visitors to your YouTube channel.
For Home Services contractors, you may wish to have DIY videos showing residential homeowners how to make simple repairs. They may find that the “simple” repairs aren’t so simple for everyone, and they may end up calling you for your services.
Channel URL (B)
The channel URL is automatically assigned to you on YouTube account creation. You can get a custom URL (e.g. YouTube.com/ContractorFAQ) once you meet the following criteria:
- Channel is > 30 days old
- You have 100+ subscribers
- You have a profile and banner image
Once you meet these threshholds (100 subscribers being the toughest), you should definitely get a custom URL as it will make it easy to share your channel and for people to find you.
Links (C)
You can link out to your website and other sites and share these links with your viewers. Linking to your main website is essential. You can see that I’ve linked to my home page at ContractorFAQ.com.
You can also link to other properties where your business has a presence – like your Google Business Profile page or your Facebook Business page.
Links on Banner (D)
Links will appear on your YouTube banner if you select them in this section.
Contact Info (E)
Provides a way for YouTube viewers to get in touch with you
Once you’ve completed your branding and basic layout, be sure to click the Publish button (F) and then view your channel (G).
Viewing Your Channel
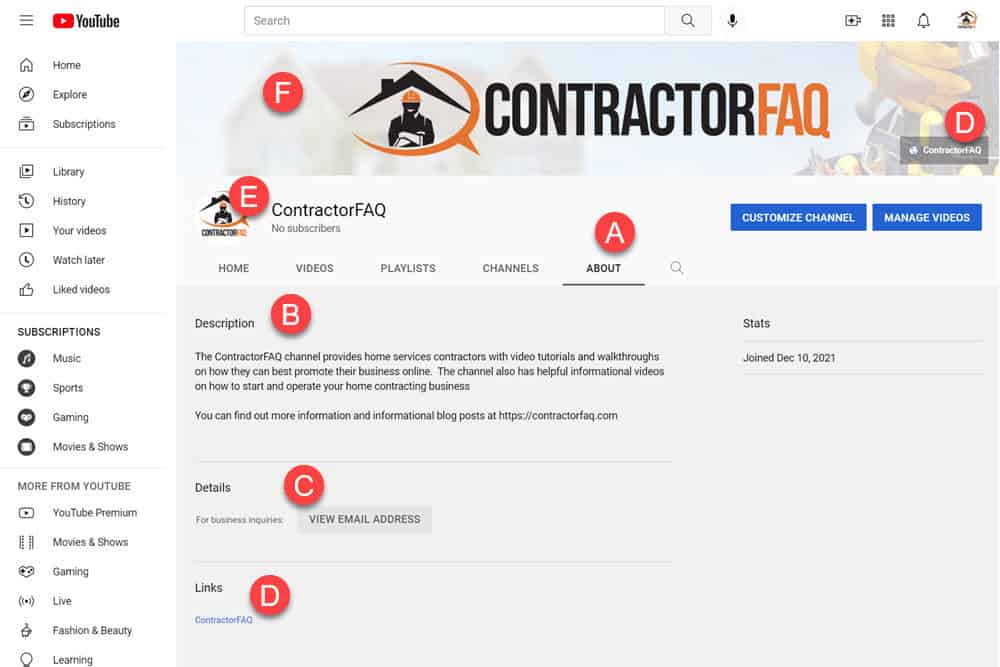
We’re now viewing the channel, and have clicked on the “About” (A) link.
Here, we see the Description (B), Email contact (C), and Links (D) that we set up in the previous step. Note that the links also appear on the banner. Clicking on the banner link or the text link will take us to the ContractorFAQ main website.
We also have the profile picture (E) and Banner (F) all set up.
Wrap Up
This post was all about the setup for your YouTube channel. Next, you’ll have to take videos and upload those videos to your channel.
Setting up a YouTube channel for your home contracting services business can be a bit challenging. It isn’t easy to set up a branded channel, and it isn’t easy to take the time to record videos that are relevant to your services.
Video is a bit of a hassle – but that hassle represents an opportunity for you. Most of your competitors don’t want to deal with this hard work involved in marketing themselves with video.
If you put in the work to take, process, and upload video content, it will be a fantastic differentiator for your business. You can use these videos just about anywhere to promote your brand – including your own website and social media sites.
