Reducing Page Load Time in WordPress
In this post, I’m going to go through a series of steps to make a website faster. We start things off by discussing the importance – according to Google – that your site must be blazing fast. I then discuss how vital it is to choose a fast web host. I then dive into making changes to a website and measuring the impact of those changes as I go through an iterative process of site speed improvement.
As part of FlexLeads’ Website as a Service (WaaS) – we create a website that generates leads for our customers. A fast loading website is a key requirement of WaaS.
Video
The video below provides insight into the process that I took to make my client’s website faster.

The Process
Before getting started, note that if you’d like to follow this process on your own site, make sure you do it in a test environment and not on your live website!
There are steps in here that are 100% guaranteed to break (temporarily) your website, and you need to have a way to restore your site.
Create a test environment for your production site, and back up frequently so you don’t have to reapply what you’ve already performed.
Google: You’d Better Be Fast
Google went on record back in 2010 saying that site speed is a signal used in ranking pages in search engine results.
Your website needs to be as fast as possible.
Having a page that loads quickly is essential for you to get more business from your website visitors. The longer it takes your web page to load, the more likely it is that people will leave – or “bounce”.
This is from a Google study on page load time and bounce rate (Google / SOASTA Research, 2017)
As your bounce rate increases from 1 second to:
- 3s – 32% increase in bounce probability
- 5s – 90% increase in bounce probability
- 10s – 123% increase in bounce probability
When website visitors bounce, they are leaving your site instead of contacting you to pay for your services or products.
Get a Fast Web Host
Go with Dedicated – Not Shared Hosting
If you’re running WordPress, one of the best things that you can do is start with an excellent web host that offers dedicated hosting. Low budget hosts feature shared hosting. They jam as many customers as possible onto a server (or shared resources), and the speed of your website will suffer significantly as a result.
Get Managed WordPress Hosting
Managed WordPress hosting doesn’t come cheap but is worth it. Managed hosts take care of many menial, time-consuming tasks like backups and core plugin updates so you don’t have to. This provides an additional layer of security and safety and frees you up from remembering to have to take care of those tasks.
Some managed hosts will also allow you to set up multiple environments for your website. This can make it easy to migrate your website from a development environment to staging to production.
Having these different environments is vital, especially when you’re conducting tests – like the focus of this article – which is making your website faster. You’ll want to conduct anything remotely risky in a test environment rather than on your live website.
Choose a Host with A CDN
Make sure your host has an extensive Content Delivery Network (CDN) with a great reputation. A CDN is a distributed network of servers, each containing your website content. The server that is closest to the user visiting your website will deliver the content to that user. Geographical distance matters and this ensures that the website visitor receives your website content fast.
Web Host Options
Here at FlexLeads, we have dedicated hosting through WPEngine. We love WPEngine and have been extremely happy with the reliability and support we get from them. There are other managed WordPress web hosts with solid reputations that we would consider as well, including Siteground, LiquidWeb, and Pagely.
Beware of Reviews
My final note regarding web hosts is about review sites. There are hundreds of web hosting review sites out there. Most have affiliate links that can cloud the objectivity of the reviewer. I’ve seen some truly awful web hosts get great reviews on prominent websites that have affiliate links to that web host.
Step 1: Measure Baseline Speed
In order to measure the effectiveness of our tweaks to improve page speed, we need to start out with a baseline home page load time.
I’ll be using GTMetrix and the Page Speed Test at Pingdom.com. These aren’t necessarily the best tools for measuring speed, but they’re easy to use and clearly display results. I’ll have a more comprehensive list of speed measurement tools at the bottom of this article.Keys to keep in mind when measuring speed online testing tools:
- Try to use the closest server to your location if possible
- Always use the same server
- Try to take multiple test results after making a change (around 3 tests should do it)
- Don’t compare results between tools – the tools measure different aspects of “speed”
I really need to emphasize the last point. All tools measure “speed” differently. For example, in GT Metrix, the load time used by default is the “fully loaded time”. Pingdom instead chooses to use “onload time” which is usually much quicker to complete than “fully loaded time”.The comparison we’ll be making won’t be between tools, rather, we’ll be looking to see if the load time for each tool improves after making modifications to improve performance.One final note, this isn’t a scientific, statistically significant analysis. We’re looking for general trends and impacts of changes that we’re making to our website.
Baseline Test
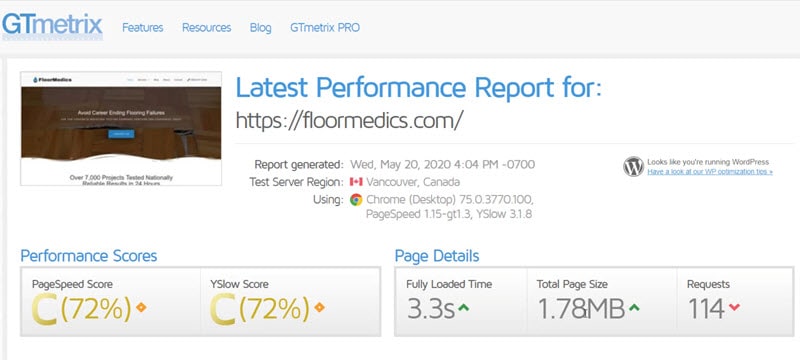
Running our baseline test (shown below), we see below that Pingdom clocks in at 1.89 seconds, GTMetrix at 6.2 seconds. Remember, these tools are measuring speed differently – so it is not an apples-to-apples comparison.
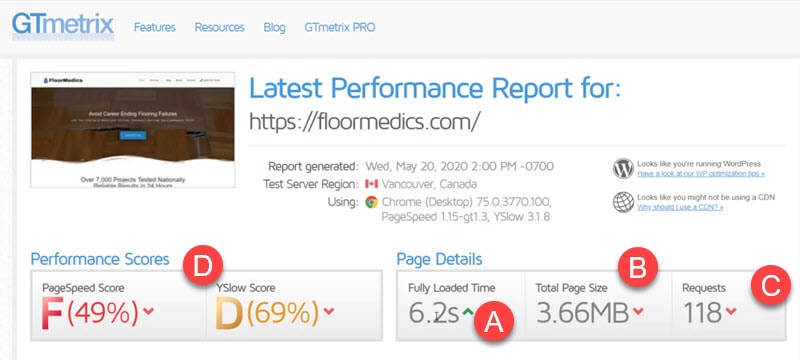
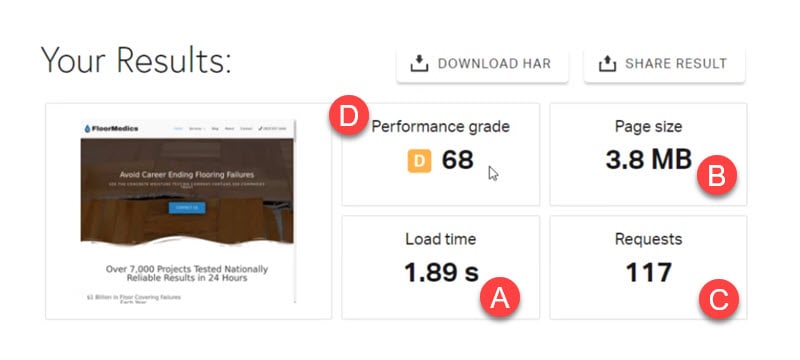
Our goal is to make changes to get Pingdom below 1.89 seconds, and GTMetrix lower than 6.2 Seconds.
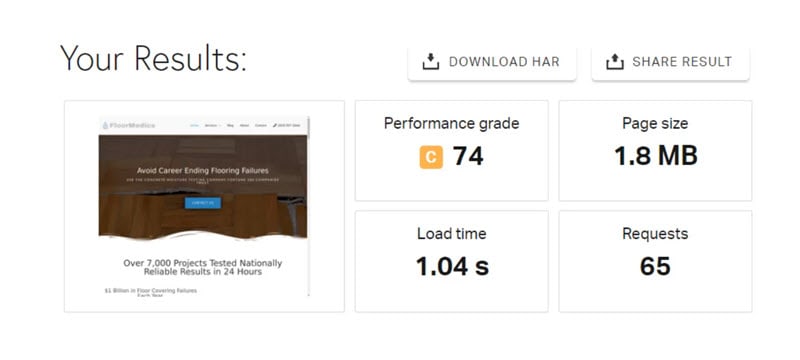
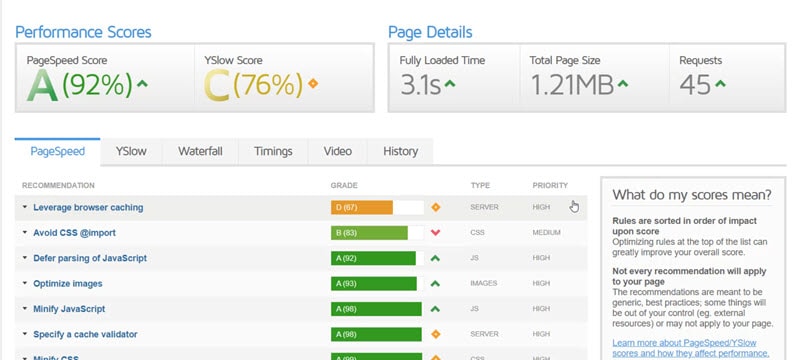
Here’s a quick breakdown of the results for each tool:(A) Load time – Both tools measure load time in seconds (although they measure slightly different things). This is the metric I’m most concerned about. In general you’ll want to run the test multiple times to get a good feel for what your actual load time is.
(B)
Page Size – Both tools also provide page size data. You’ll want to look at page size because it tends to correlate well with load time. If your pages are smaller they will generally tend to load more quickly
(C) Requests – Both tools show the total number of requests. A reduction in total number of requests generally correlates well with a lower load time.
(D)Performance Grade – I don’t care about the letter grades. While these are associated with best practices, improving a letter grade doesn’t necessarily mean that your page load time will increase.
Page Speed Score Card (Baseline Speed Test)
| Implementation | Pingdom Load Time (seconds) |
GTmetrix Load Time (seconds) |
|---|---|---|
| Baseline Speed Test | 1.89 | 6.2 |
| Webhost CDN | ||
| ShortPixel Image Optimization | ||
| WordPress Scripts | ||
| Autoptimization Speed Plugin | ||
| Cloudflare CDN |
Step 2: Use a CDN
CDN Overview
A content delivery network (CDN) is a distributed network of servers that each contain a copy of your website content. The servers are spread out geographically, and the goal is to reduce the time to load your website content by having a server physically near the person who is visiting your website.
CDN Setup
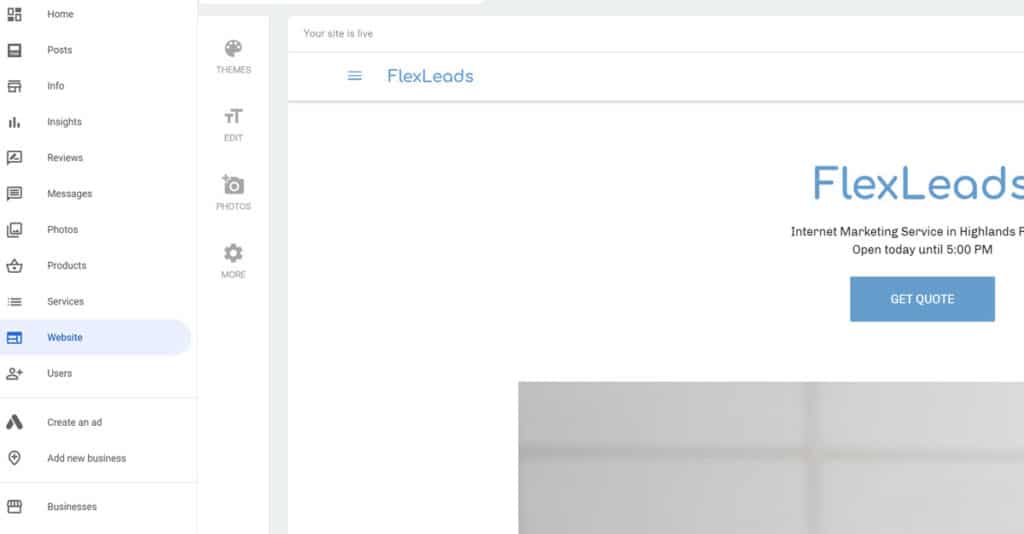
Quality web hosts offer CDN to their clients in order to make their sites load much faster for their users. Below is a screenshot of the WPEngine hosting interface which allows you to take advantage of their CDN by just clicking a button.

CDN Implementation Test Results
For our fist improvement for our FloorMedics.com website we’ve enabled the CDN at WPEngine. You can see that we witnessed immediate improvements. GT Metrix saw a massive jump in load time from 6.2 seconds to 2.6 seconds. Pingdom reported a modest improvement of .13 seconds.
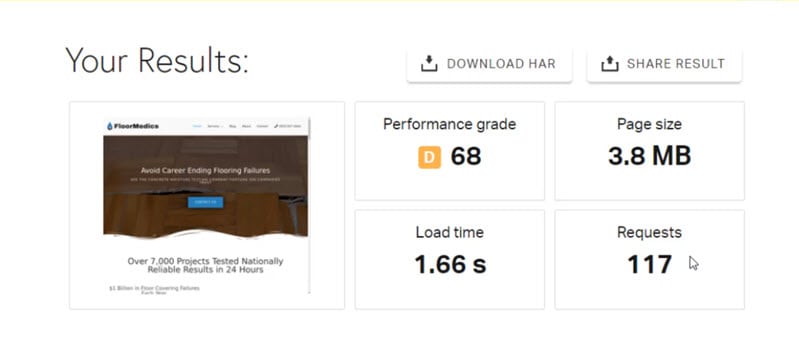

Pingdom: 1.66 seconds (was 1.89 seconds)
GTMetrix: 2.6 seconds (was 6.2 seconds)
Page Speed Score Card – After Applying Webhost CDN
| Implementation | Pingdom Load Time (seconds) |
GTmetrix Load Time (seconds) |
|---|---|---|
| Baseline Speed Test | 1.89 | 6.2 |
| Webhost CDN | 1.66 (▼.23) | 2.6 (▼3.6) |
| ShortPixel Image Optimization | ||
| WordPress Scripts | ||
| Autoptimization Speed Plugin | ||
| Cloudflare CDN |
Step 3: Optimize Images with a Plugin
Image Optimization and Compression Overview
Incorrectly optimized images are probably the biggest culprit for slow page load times.
In a perfect world, you would resize and compress all images for your website to the perfect size and resolution prior to upload.
In reality, putting together web content is quite messy. Adding images to a website is a trial and error process. As a result, you’ll find yourself uploading images without optimizing to see how they’ll look on a page.
Once your site is completed and you’re ready to optimize, you have three options:
1) Resize and Optimize Each Image on Your Site
Going through each image on your website is likely going to be a tedious process that yields relatively little benefit for the time you’re putting into it, and I don’t recommend it.
2) Use Screaming Frog to Identify Potential Problem Images
Use an application like Screaming Frog to analyze all images on your website. This will give you a quick look at any images that are large and have the potential to be optimized.
The simple process works like this:
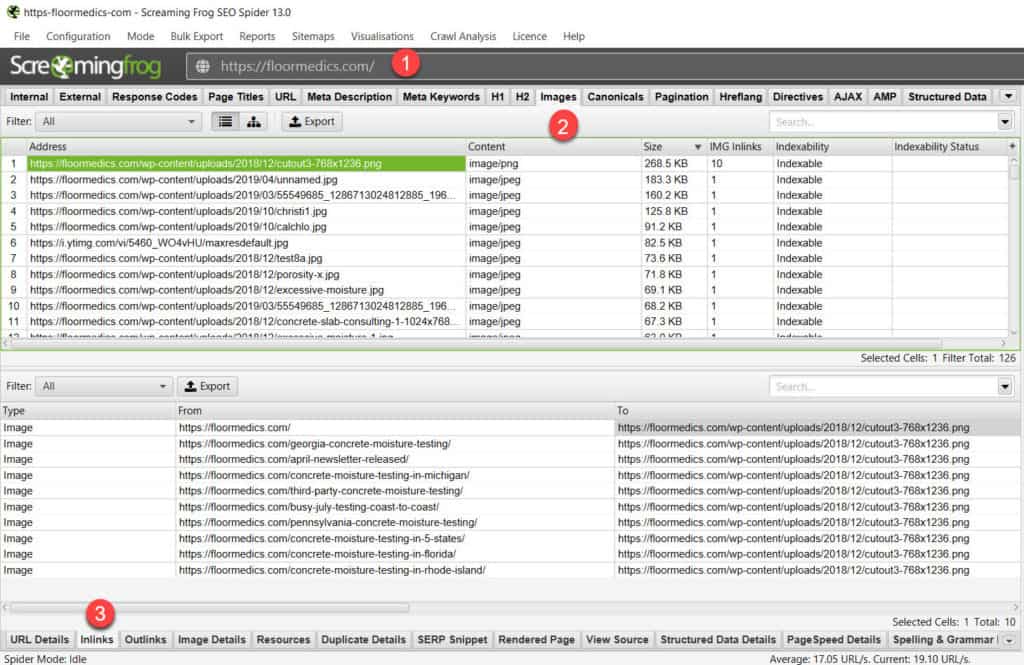
(1) Enter your domain name and crawl your site
(2) Click on the images tab and sort by image size (descending)
(3) Click on the “Inlinks” tab on the bottom
Doing this will allow you to see the largest images on the site. You’ll probably identify multiple images that you can replace with optimized versions of those images. Note that if you’re optimizing images individually, you can use an online image optimization tool like tinypng.
3) Use a Plugin
Plugins will automatically optimize your images to reduce their overall size, and in turn help your site to load more quickly.
In most cases, you’ll want to choose options #2 AND #3. First, do a quick check with Screaming Frog to see if there are any bloated images that could be easily optimized. Then, use an image optimizer plugin to reduce the size of your images (without reducing the quality of the images).
Image Optimization Setup
For the website that I’m working with, I use a plugin called ShortPixel. Note that there are many different image optimization plugins available for WordPress – many are displayed in the resources section of this article.
I’m not a ShortPixel expert, but the following steps worked well enough for me. From the general tab, I went with the “Lossy” recommendation. I also include thumbnails and backup all original images as shown in the screenshot below.
I’m not a ShortPixel expert, but the following steps worked well enough for me. From the general tab, I went with the “Lossy” recommendation. I also include thumbnails and backup all original images as shown in the screenshot below.
When I’m done selecting my optimizations, I’m able to optimize all of my website images with a single click. In the screenshot below, I’m optimizing 1,150 images with a single click. Much faster than having to go through and optimize each image individually.
Image Optimization Test Results
Pingdom: 1.65 seconds (was 1.66 seconds)
GTMetrix: 2.5 seconds (was 2.6 seconds)
As you can see, there was no noticeable improvement in overall page load time using either of our tools. There was a reduction in overall page size however, which is a definite positive even though no improvement was reflected in the load time.Your mileage may vary, and it is definitely worth experimenting with optimizing your images. I’m guessing that you’ll usually see improvements.
Page Speed Score Card
| Implementation | Pingdom Load Time (seconds) |
GTmetrix Load Time (seconds) |
|---|---|---|
| Baseline Speed Test | 1.89 | 6.2 |
| Webhost CDN | 1.66 (▼.23) | 2.6 (▼3.6) |
| ShortPixel Image Optimization | 1.65 (▼.01) | 2.5 (▼.1) |
| WordPress Scripts | ||
| Autoptimization Speed Plugin | ||
| Cloudflare CDN |
Step 4: Modify Default WordPress Loading
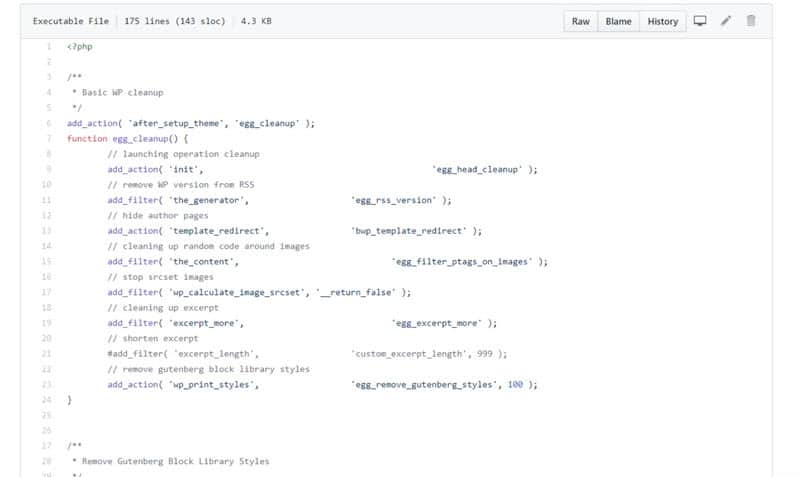
These scripts are courtesy of my friend Tim Bowen over at Creative Slice. I should say that these scripts are not for the faint of heart and you should only try them in a development or test environment as there is a strong possibility that they will break your site.
The scripts are designed to skip native WordPress functions that in some cases can contribute to increasing load time.
Scripts Test Results
Pingdom load time went from 1.65 seconds to 1.08 Seconds
GTMetrix load time actually increased from 2.6 seconds to 3.3 seconds
Page Speed Score Card
| Implementation | Pingdom Load Time (seconds) |
GTmetrix Load Time (seconds) |
|---|---|---|
| Baseline Speed Test | 1.89 | 6.2 |
| Webhost CDN | 1.66 (▼.23) | 2.6 (▼3.6) |
| ShortPixel Image Optimization | 1.65 (▼.01) | 2.5 (▼.1) |
| WordPress Scripts | 1.08 (▼.57) | 3.3 (▲.08) |
| Autoptimization Speed Plugin | ||
| Cloudflare CDN |
Step 5: Use a Speed Optimization Plugin
Speed Optimization Plugin Overview
Next, we’re going to use a speed optimization plugin called Autoptimize. There are a ton of speed optimization plugins available. Autoptimize is a free plugin that comes with the option to have the experts at autoptimize help you with your site (for a fee).
Autoptimize Setup
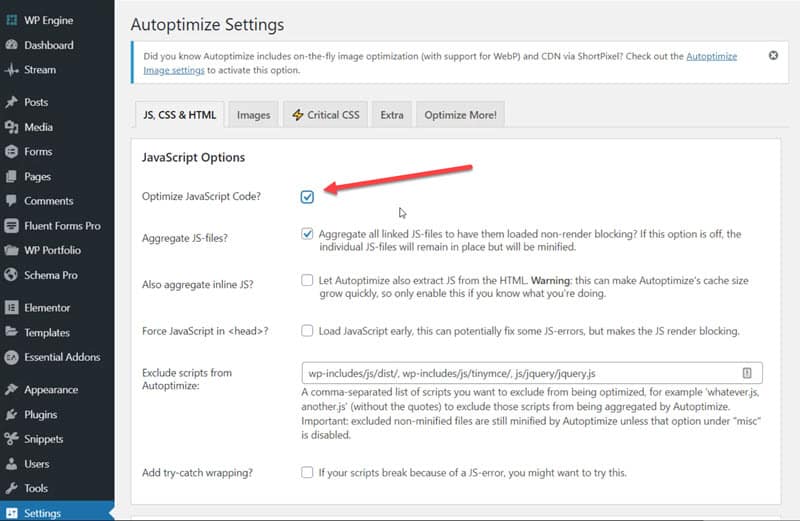
For the most part, I just went with the default options offered by the plugin.
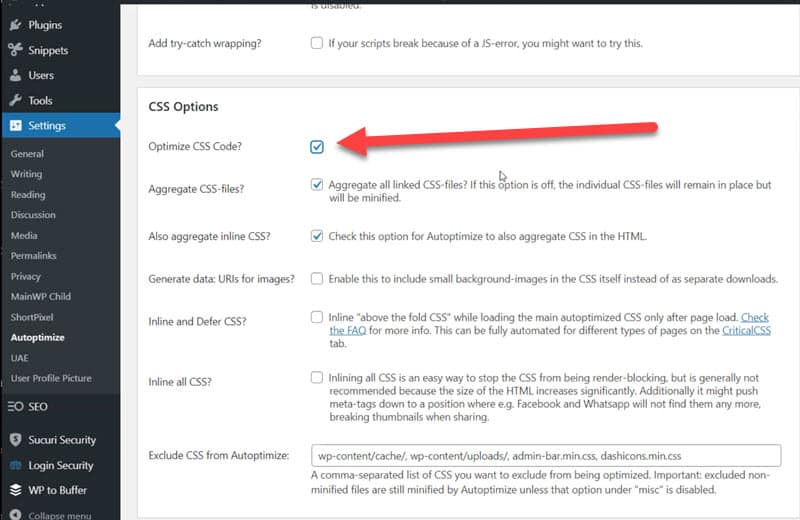
When using Autoptimize, I chose to optimize Javascript and CSS code. It then presented many more detailed options for me to choose, but I just stuck with the default recommendations within the plugin.
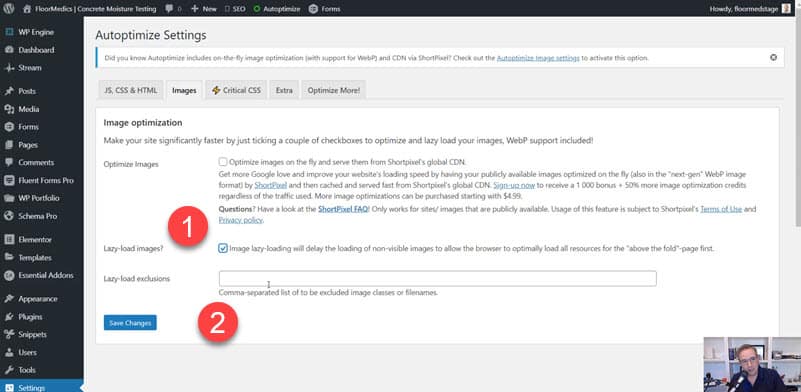
On the images tab, I chose to Lazy Load images (1) as shown in the screenshot below. Note that when you lazy load images, you probably shouldn’t lazy load all images. In the screenshot (2) Autoptimize gives you the option to omit some images from lazy loading. You want everything that is generally above the fold (like your logo) to be visible and not to lazy load.
Autoptimize Test Results
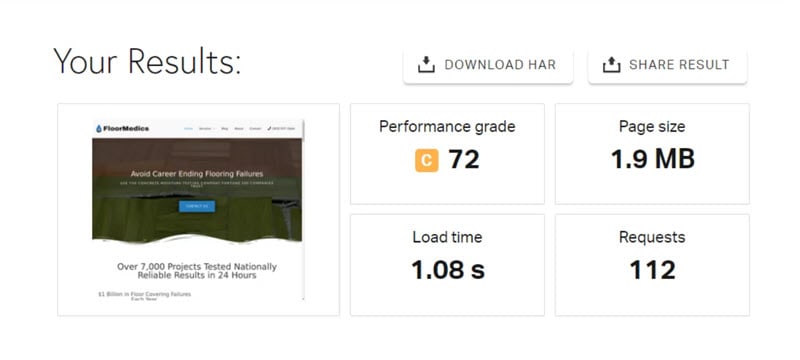
Pingdom went from 1.08 seconds to 1.04 seconds
GT Metricks went from 3.3 seconds to 3.1 seconds
Modest improvements, but definitely worth experimenting with this plugin.
Page Speed Score Card
| Implementation | Pingdom Load Time (seconds) |
GTmetrix Load Time (seconds) |
|---|---|---|
| Baseline Speed Test | 1.89 | 6.2 |
| Webhost CDN | 1.66 (▼.23) | 2.6 (▼3.6) |
| ShortPixel Image Optimization | 1.65 (▼.01) | 2.5 (▼.1) |
| WordPress Scripts | 1.08 (▼.57) | 3.3 (▲.08) |
| Autoptimization Speed Plugin | 1.04 (▼.57) | 3.1 (▼.02) |
| Cloudflare CDN |
6. CloudFlare CDN
Cloudflare Overview
CloudFlare is home to a free, lightning fast CDN.The performance is superior to the CDNs offered by most web hosts, and if you don’t have a CDN through your webhost, you should definitely consider using CloudFlare. Even if you do have a solid CDN through your webhost, you should strongly consider using CloudFlare.
CloudFlare Setup
Cloudflare setup is usually quite easy. With a couple of exceptions I’ve had few issues using Cloudflare as my CDN.
You’ll want to get set up on Cloudflare during off hours so as not to disrupt your website traffic (or your business). Here are the general steps involved:
- If you have a CDN already through your webhost, disable it
- Sign up for Cloudflare
- Review and adjust your DNS Settings in Cloudflare – this information is imported from current nameservers, so it should be mostly accurate
- CloudFlare provides you with nameservers
- Go to your registrar and replace your nameservers with the nameservers provided by Cloudflare
- Adjust your settings within Cloudflare. Settings that I set up are shown below
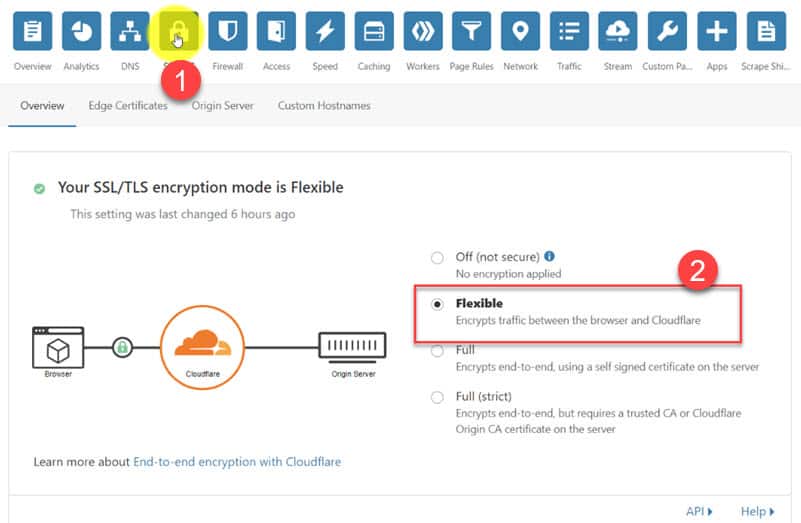
SSL/TS
Under “Overview”
I have found that Flexible is the best option for encryption mode (shown below). I ran into issues when using Full.
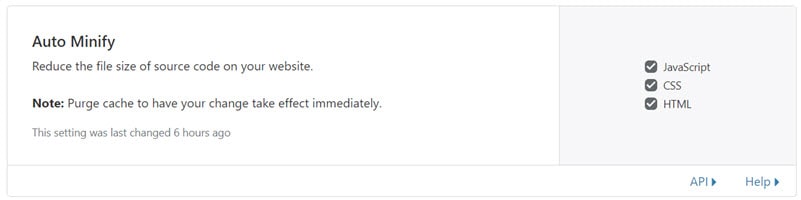
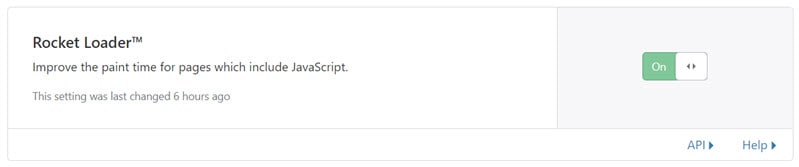
Speed (Under the Optimization Setting)
Cloudflare Test Results
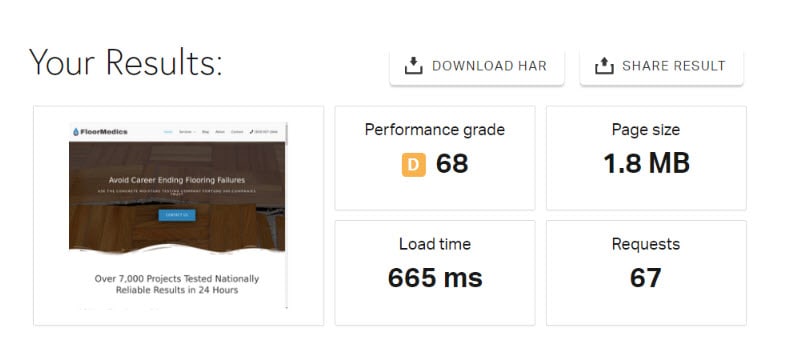
Pingdom went from 1.04 seconds to .665 seconds
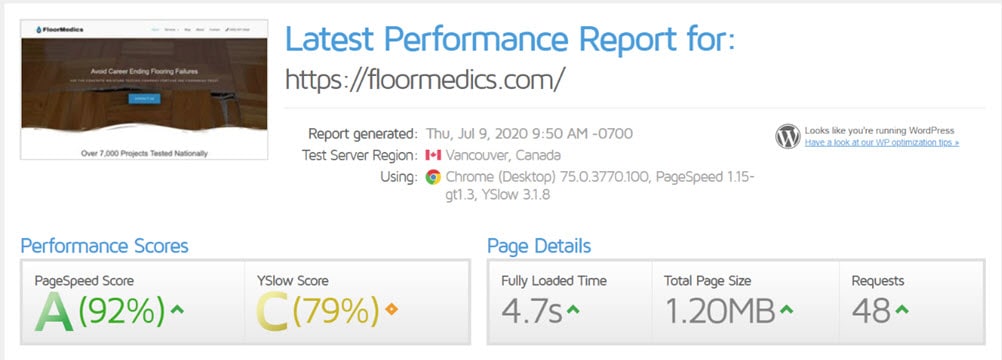
GT Metricks went from 3.1 seconds to 4.7 seconds
Page Speed Score Card (FINAL)
| Implementation | Pingdom Load Time (seconds) |
GTmetrix Load Time (seconds) |
|---|---|---|
| Baseline Speed Test | 1.89 | 6.2 |
| Webhost CDN | 1.66 (▼.23) | 2.6 (▼3.6) |
| ShortPixel Image Optimization | 1.65 (▼.01) | 2.5 (▼.1) |
| WordPress Scripts | 1.08 (▼.57) | 3.3 (▲.08) |
| Autoptimization Speed Plugin | 1.04 (▼.57) | 3.1 (▼.02) |
| Cloudflare CDN | .665 (▼.38) | 4.7 (▲1.6) |
Conclusion
When trying to make your website faster, it is extremely difficult to isolate variables to determine exactly what change resulted in a reduction in load time. Time of day, server load and traffic volume can all vary greatly and result in different test results from minute to minute.
Many of the plugins and CDN features I utilized for this analysis actually have overlapping features. This makes it difficult to properly attribute reduced page load to a specific action.
Although my approach may not be perfect, it did results in a page load reduction of 66% on Pingdom, and 25% in GTmetrix. If you’re trying to reduced the time it takes to load your site, I would recommend trying a variety of different approaches – as I did here – to see what seems to work best.